2010-12-31

Windows Message in the Unity3D : Hooks

參考這篇連結,讓 Unity 也可以做 Hook Windows Message 的動作,底下是修改並精簡至 Unity 的範例,範例中的 m_hookType 設定成 WH_KEYBOARD ,所以是 hook 鍵盤的訊息,若要 hook 其它的訊息可以透過修改 m_hookType 來達成,我們可以在 CoreHookProc 處理傳來的鍵盤訊息,使 Unity 做出對應的動作(但要注意的是,呼叫CoreHookProc的 Thread 不是 Unity 的主要 Thread,不能執行非 thread-safe Unity API!)。

大概敘述一下底下範例的使用方法:

1) 建立一個新的 C Sharp Script,取名為 KBHooks,並將範例的程式碼覆蓋進去。
2) 將此 KBHooks.cs 從 Project 拖曳至 Hierarchy 內的 Main Camera 上。
3) 執行。

執行時在鍵盤上敲幾個鍵,離開執行之後會在 Console 視窗看到類似的訊息:


KBHooks.cs:
using UnityEngine;
 
using System;
using System.Collections;
using System.Runtime.InteropServices;
 
public class KBHooks : MonoBehaviour
{
    [DllImport("user32")]
    protected static extern IntPtr SetWindowsHookEx(
        HookType code, HookProc func, IntPtr hInstance, int threadID);
 
    [DllImport("user32")]
    protected static extern int UnhookWindowsHookEx(
        IntPtr hhook);
 
    [DllImport("user32")]
    protected static extern int CallNextHookEx(
        IntPtr hhook, int code, IntPtr wParam, IntPtr lParam);
 
    [DllImport("Kernel32")]
    protected static extern uint GetLastError();
 
    // Hook Types
    protected enum HookType : int
    {
        WH_JOURNALRECORD = 0,
        WH_JOURNALPLAYBACK = 1,
        WH_KEYBOARD = 2,
        WH_GETMESSAGE = 3,
        WH_CALLWNDPROC = 4,
        WH_CBT = 5,
        WH_SYSMSGFILTER = 6,
        WH_MOUSE = 7,
        WH_HARDWARE = 8,
        WH_DEBUG = 9,
        WH_SHELL = 10,
        WH_FOREGROUNDIDLE = 11,
        WH_CALLWNDPROCRET = 12,
        WH_KEYBOARD_LL = 13,
        WH_MOUSE_LL = 14
    }
 
    protected IntPtr m_hhook = IntPtr.Zero;
    protected HookType m_hookType = HookType.WH_KEYBOARD;
 
    protected delegate int HookProc(int code, IntPtr wParam, IntPtr lParam);
 
    protected bool Install(HookProc cbFunc)
    {
        if (m_hhook == IntPtr.Zero)
            m_hhook = SetWindowsHookEx(
                m_hookType, 
                cbFunc, 
                IntPtr.Zero, 
                (int)AppDomain.GetCurrentThreadId());
 
        if (m_hhook == IntPtr.Zero)
            return false;
 
        return true;
    }
 
    protected void Uninstall()
    {
        if (m_hhook != IntPtr.Zero)
        {
            UnhookWindowsHookEx(m_hhook);
            m_hhook = IntPtr.Zero;
        }
    }
 
    protected int CoreHookProc(int code, IntPtr wParam, IntPtr lParam)
    {
        if (code < 0)
            return CallNextHookEx(m_hhook, code, wParam, lParam);
 
        Debug.Log(
            "hook code =" + code.ToString() + 
            " lparam=" + lParam.ToString() + 
            " wparam=" + wParam.ToString());
 
        // Yield to the next hook in the chain
        return CallNextHookEx(m_hhook, code, wParam, lParam);
    }
 
    // Use this for initialization
    void Start()
    {
        Debug.Log("install hook");
        Install(CoreHookProc);
    }
 
    void OnDisable()
    {
        Debug.Log("Uninstall hook");
        Uninstall();
    }
 
}

2010-12-24

從檔案載入 Lua function 至名稱空間

參考連結,可將 lua 檔案裡的程式載入到 namespace 裡,好處是可避免各個不同檔案裡出現相同 function 的問題。

稍微針對 C# 做了修改如下:

protected bool load_file_into_namespace(IntPtr L, string S, string N, bool bCall)
{
    lua_pushlstring(L, N, N.Length);
    lua_gettable(L, (-10002));
 
    if (lua_isnil(L, -1))
    {
        lua_pop(L, 1);
        lua_newtable(L);
        lua_pushlstring(L, N, N.Length);
        lua_pushvalue(L, -2);
        lua_settable(L, (-10002));
    }
    else
    {
        if (!lua_istable(L, -1))
        {
            lua_pop(L, 1);
            return (false);
        }
    }
 
    lua_newtable(L);
    lua_pushlstring(L, "_G", 2);
    lua_gettable(L, (-10002));
    lua_pushnil(L);
    while (lua_next(L, -2) != 0)
    {
        lua_pushvalue(L, -2);
        lua_pushvalue(L, -2);
        lua_settable(L, -6);
        lua_pop(L, 1);
    }
 
    if ((luaL_loadfile(L, S) > 0))
    {
        Console.Write("Error in file " + S + "!\n");
        for (int i = 0; ; i++)
            if ((lua_isstring(L, i) > 0))
            {
                Console.Write(lua_tolstring(L, i, IntPtr.Zero) + "\n");
            }
            else
                break;
        lua_error(L);
        lua_pop(L, 3);
        return (false);
    }
 
    if (bCall)
        lua_call(L, 0, 0);
    else
        lua_insert(L, -4);
 
    lua_pushnil(L);
    while (lua_next(L, -2) != 0)
    {
        lua_pushvalue(L, -2);
        lua_gettable(L, -5);
        if (lua_isnil(L, -1))
        {
            lua_pop(L, 1);
            lua_pushvalue(L, -2);
            lua_pushvalue(L, -2);
            lua_pushvalue(L, -2);
            lua_pushnil(L);
            lua_settable(L, -7);
            lua_settable(L, -7);
        }
        else
        {
            lua_pop(L, 1);
            lua_pushvalue(L, -2);
            lua_gettable(L, -4);
            if (!(lua_equal(L, -1, -2) > 0))
            {
                lua_pushvalue(L, -3);
                lua_pushvalue(L, -2);
                lua_pushvalue(L, -2);
                lua_pushvalue(L, -5);
                lua_settable(L, -8);
                lua_settable(L, -8);
            }
            lua_pop(L, 1);
        }
        lua_pushvalue(L, -2);
        lua_pushnil(L);
        lua_settable(L, -6);
        lua_pop(L, 1);
    }
 
    lua_pop(L, 3);
    return (true);
}

其中 S 表示檔案路徑, N 表示名稱空間。呼叫名稱空間內的 function 方式也會有些不同:

1) 以 luaL_dostring 方式呼叫:

假設載入的file0.lua 檔如下:
function pp()
  print("this is file0");
end

載入的 file1.lua 檔案下:
function pp()
  print("this is file1");
end

載入 file0.lua 時設定的 namespace 為 A0,載入 file1.lua 時設定的 namespace 為 A1,載入的程式碼為:
load_file_into_namespace(m_luaState, "file0.lua", "A0", true);
load_file_into_namespace(m_luaState, "file1.lua", "A1", true);

則分別呼叫 file0.lua及file1.lua內的 pp() 函數方式如下:
A0.pp();
A1.pp();

程式碼寫法是:
luaL_dostring(m_luaState, "A0.pp()");
luaL_dostring(m_luaState, "A1.pp()");

2) 以 lua_pcall 方式呼叫(以呼叫 A0.pp() 為例子)
lua_getglobal(m_luaState, "A0");
if (lua_type(m_luaState, -1) == 5)
{
    lua_getfield(m_luaState, -1, "pp");
 
    if (lua_type(m_luaState, -1) == 6)
    {
        // This removes the foo table from the stack
        lua_replace(m_luaState, -2); 
        ret = lua_pcall(m_luaState, 0, 0, 0);
 
        if (ret != 0)
        {
            lua_pop(m_luaState, 1);
        }
    }
    else
    {
        lua_pop(m_luaState, 2);
    }
 
}
else
{
    lua_pop(m_luaState, 1);
}

2010-12-17

Hermite Curve (Hermite Spline)

參考 這個連結 ,Hermite Curve 可以寫成一個 2D Hermite Curve Function 如下:

void hermiteCurve(
 const float t, 
 const float* vPt, 
 const float* vTangent, 
 float* pOutPt)
{
    float tt = t * t;
    float ttt = tt * t;
 
 for (int i=0;i<2;++i)
 {
    pOutPt[i] =(2.0f * ttt - 3.0f * tt + 1.0f) * vPt[0*2+i] + 
       (ttt - 2.0f * tt + t) * vTangent[0*2+i] + 
       (-2.0f * ttt + 3.0f * tt) * vPt[1*2+i] + 
       (ttt - tt) * vTangent[1*2+i];
 }
 
}

其中 t 表示欲內插的點在曲線上的比例值(區間從 0~1)。vPt 表示曲線的起點跟終點位置,是一個 float[4] 的變數,其中起點是(vPt[0], vPt[1]),終點是(vPt[2], vPt[3])。vTangent 表示曲線起點跟終點的切線向量,其中起點的切線向量是(vTangent[0], vTangent[1]),終點的切線向量是(vTangent[2], vTangent[3])。pOutPt 是比例值 t 內插出來的位置,是一個 float[2] 的變數。

2010-12-13

Unity 3D + freeimage library 執行時期載入圖檔

unity 本身提供方便的檔案載入功能 WWW(參考連結),它能讓程式在執行當中從網路或者硬碟載入資料,底下是一個 WWW 簡單的圖檔載入方法:

using UnityEngine;
using System.Collections;
 
public class example : MonoBehaviour {
    public string url = "http://images.earthcam.com/ec_metros/ourcams/fridays.jpg";
    IEnumerator Start() {
        WWW www = new WWW(url);
        yield return www;
        renderer.material.mainTexture = www.texture;
    }
}

但是使用WWW目前只能載入PNG和JPG兩種格式的圖檔,若要在程式執行時載入其它格式的圖檔,就要自己把檔案轉成 Unity Color 格式再寫入 Texture2D 物件,底下是使用 Unity 3D + freeimage library 來讀取圖檔的範例:

1) 到 這裡 下載 FreeImageDLL,其中包含 FreeImageNET.dll, FreeImage.dll 兩個檔案,將這兩個檔案在專案的 Plugins 目錄下。

2) 到 Project Settings --> Player --> Optimization 將 Api Compatibility Level 改為 .Net 2.0(預設通常為 .Net 2.0 Subset)

3) 建立一個 C Sharp Script 之後直接就可以使用 freeimage API,這邊列舉載入圖片的方法:

bool load24BITBMPImage(string strPath, out Texture2D pOutTex)
{
    if (!FreeImageAPI.FreeImage.IsAvailable())
    {
        pOutTex = null;
        return false;
    }
 
    FreeImageAPI.FIBITMAP dib = FreeImageAPI.FreeImage.Load(FreeImageAPI.FREE_IMAGE_FORMAT.FIF_BMP, strPath, FreeImageAPI.FREE_IMAGE_LOAD_FLAGS.DEFAULT);
    if (dib.IsNull)
    {
        FreeImageAPI.FreeImage.Unload(dib);
 
        pOutTex = null;
        return false;
    }
 
    uint nWidth = FreeImageAPI.FreeImage.GetWidth(dib);
    uint nHeight = FreeImageAPI.FreeImage.GetHeight(dib);
    uint nPitch = FreeImageAPI.FreeImage.GetPitch(dib);
 
    pOutTex = new Texture2D((int)nWidth, (int)nHeight, TextureFormat.ARGB32, false);
    Color[] pColor = new Color[nWidth * nHeight];
 
    // 參考 FreeImage Sample5 - Working with pixels
    // Iterate over all scanlines
    for (int i = 0; i < FreeImageAPI.FreeImage.GetHeight(dib); i++)
    {
        // Get scanline
        FreeImageAPI.Scanline<FreeImageAPI.RGBTRIPLE> scanline = new FreeImageAPI.Scanline<FreeImageAPI.RGBTRIPLE>(dib, i);
 
        // Get pixeldata from scanline
        FreeImageAPI.RGBTRIPLE[] rgbt = scanline.Data;
 
        // Iterate over each pixel reducing the colors intensity to 3/4 which
        // will darken the bitmap.
        for (int j = 0; j < rgbt.Length; j++)
        {
            pColor[i * nWidth + j].b = rgbt[j].rgbtBlue;
            pColor[i * nWidth + j].g = rgbt[j].rgbtGreen;
            pColor[i * nWidth + j].r = rgbt[j].rgbtRed;
        }
 
    }
 
    pOutTex.SetPixels(pColor, 0);
    pOutTex.Apply();
 
    pColor = null;
    FreeImageAPI.FreeImage.Unload(dib);
 
    return true;
}

但此方法在寫入 pColor 矩陣時的速度有點慢,關於這部分有另一種作法是使用指標操作來寫入,大概的方式是使用 FreeImage 的 GetBits 指令來取得記憶體位置, pColor 方面則是使用 GCHandle.alloc 及 AddrOfPinnedObject 來取得 pColor 的記憶體位置,最後利用呼叫外部 dll 方式由 C 語言指標來完成工作。

2010-12-02

Unity 3D 字串只顯示在指定區域內

3D Text 字串顯示可用在很多地方例如文字編輯器,跑馬燈等...。以跑馬燈為例,字體因為只能顯示在特定範圍內,因此當字體從邊框跑進來時需要對字體進行裁切。這邊對字體裁切的概念是在字串 Mesh 前方建立一個隱形的 Clipper,當後方字串進行貼圖時,將圖片像素的座標空間轉換至 Clipper 的座標空間,然後檢查像素的範圖是否在 Clipper 內,否則將像素設定成透明。


欲達成上述效果需要自己寫相對應的 Shader 並套用在 3D Text 上,這裡提供 Shader 如下:
Shader "ModifiedTextShader"
{ 
 Properties
 {
  _MainTex ("Font Texture", 2D) = "white" {}
  _Color ("Text Color", Color) = (1,1,1,1) 
 }
 
 SubShader
 {
  Tags
  {
   "Queue"="Transparent"
   "IgnoreProjector"="True" 
   "RenderType"="Transparent"
  }
 
  Pass
  {
   CGPROGRAM
   // Upgrade NOTE: excluded shader from OpenGL ES 2.0 because it does not contain a surface program or both vertex and fragment programs.
   #pragma exclude_renderers gles
   #pragma vertex vert
   #pragma fragment frag
   #include "UnityCG.cginc"
 
   struct v2f
   {
    float4 pos : SV_POSITION;
    float4 uv[2] : TEXCOORD0;
    float4 color : COLOR0;
   };
 
   uniform float4x4 _ClipMatrix;
   uniform float4 _Color;
   sampler2D _MainTex;
   uniform float _ClipWidth;
   uniform float _ClipHeight;
 
   v2f vert( appdata_base v )
   {
    v2f o;
    o.pos = mul (UNITY_MATRIX_MVP, v.vertex);
 
    o.uv[0] = v.texcoord;
 
    float4 c = mul( _Object2World, v.vertex ); 
    c = mul( _ClipMatrix, c ); 
    o.uv[1] = c;
 
    o.color = _Color;
 
    return o;
   }
 
   half4 frag(v2f i) : COLOR
   {
    half4 texcol =tex2D(_MainTex, i.uv[0].xy);
    texcol =float4(i.color.r, i.color.g, i.color.b ,texcol.a);
 
    float halfWidth =_ClipWidth*0.5f;
    float halfHeight =_ClipHeight*0.5f;
    if (
     i.uv[1].x >halfWidth || 
     i.uv[1].x <-halfWidth|| 
     i.uv[1].y >halfHeight || 
     i.uv[1].y <-halfHeight)
     texcol.a =0;
 
    return texcol;
   }
 
   ENDCG
 
   Cull Off
   ZWrite On 
   Fog { Mode Off } 
   Blend SrcAlpha OneMinusSrcAlpha 
  }
 } 
}

其中 _ClipMatrix,_ClipWidth與_ClipHeight分別代表Clipper的座標轉換矩陣,Clipper的寬度和Clipper的高度,使用此Shader時:

1) 將此Shader設定給3DText的Mesh Renderer
2) 設定 font Texture 給此 Shader 的 Font Texture
3) 建立 clipper 物件並在物件內加入下列指令:
Shader.SetGlobalMatrix("_ClipMatrix", transform.worldToLocalMatrix);
Shader.SetGlobalFloat("_ClipWidth", 20.0f);
Shader.SetGlobalFloat("_ClipHeight", 20.0f);
分別代表設定 Clipper 轉換矩陣、Clipper的寬度為 20, Clipper的高度為 20。

Unity 3D 顯示字串

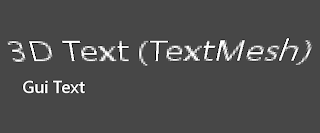
Unity 有兩種物件專門用來顯示字串,分另是 GUI Text 和 3D Text (Text Mesh)。


GUI Text 使用上相當方便,螢幕座標設定範圍是 0.0 ~1.0,只能做 2D 顯示,3D Text 則是在 3D 空間實際產生 Mesh 並以貼圖的方式顯示字串。大概可以了解到優缺點如下:

GUI Text
優點:使用方便, 速度快。
缺點:無法旋轉,無法覆蓋,無法變形。

3D Text
優點:所有可以應用在 Mesh 上的功能。
缺點:因為要畫Mesh並做貼圖動作,也許速度較慢,設定較麻煩。

礙於功能上的需要,例如字串的旋轉、縮放效果。似乎 2D 的 GUI 也使用 3D Text (Text Mesh) 會比較合理,但 3D Text 在透視投影模式的 Camera 之下顯示不如 GUI Text 來得清晰,其實透過設定就可以讓 3D Text 顯示的效果與 GUI Text 一模一樣,設定方法如下:


1) 將 Camera 的投影模式設定成 Orthographic,並設定  Orthographic Size 為 Screen.height 的 0.5 倍。
2) 設定 3D Text 物件 Scale 的 x, 和 y 分別是 Orthographic Size 的 0.022 倍,例如 Orthographic Size 為 100,則 Scale 就是 2.2,固定是  10 倍,此時的 Font Size 值效果將與 GUI Text 的 Font Size 值效果相同。

這邊可能有疑問的是 Camera 若設定成 Orthographic 投影模式,則會影響到其它物件的顯示,解決方法是在場景裡新建一個 Camera, 由此新建的 Camera 負責 Text 的部分,利用 Layer 及 Culling Mask 的功能把揚景裡的物件及 3D Text 區分開並分別指定給各個 Camera。

2010-11-18

MAC Samba 速度緩慢

為了改善速度,到目前為止做了以下調整:

1) 將 net.inet.tcp.delayed_ack 設為 0
2) 在 smb.conf 的 [global] 區段加入:

large readwrite = no  (此參數會造成檔案讀取錯誤)

read size = 1024
socket options = TCP_NODELAY IPTOS_LOWDELAY SO_KEEPALIVE SO_SNDBUF=8576 SO_RCVBUF=8576

Note:
參考 http://www.macosxhints.com/article.php?story=20040324053434397
參考 http://www.mobile01.com/topicdetail.php?f=177&t=183347&p=1
net.inet.tcp.delayed_ack 設定方法:

 sudo -s
Password:
 cd /etc
 touch sysctl.conf
 echo 'net.inet.tcp.delayed_ack=0' >sysctl.conf
 exit

檢查 net.inet.tcp.delayed_ack 的值:

 sysctl net.inet.tcp.delayed_ack

使用 vim 來修改 smb.conf:
 sudo vi /etc/smb.conf

鍵入 i 進入 INSERT 模式,ESC 離開。
鍵入 :wq 存檔離開。

2010-11-16

移除 MAC 上的 Skype 和 MSN

移除 Skype :
1) 刪除 Skype.app
2) 刪除 /Library/Preferences/com.skype.skype.plist
3) 刪除 /Users/username/Library/Preferences/com.skype.skype.plist
4) 刪除 /Users/Library/Application Support/Skype 目錄

5) 到 系統偏好設定 --> 帳號 --> 登入項目 移除 Skype

移除 MSN
1) 刪除 msn.app
2) 刪除 /Users/username/Library/Preferences/com.microsoft.Messenger.plist
3) 刪除 /Users/username/Library/Preferences/com.microsoft.Messenger.rtc.plist
4) 刪除 /Users/username/Library/Preferences/Microsoft/Microsoft Messenger User Cache.plist
5) 刪除 /Users/username/Documents/Microsoft Messenger.log


2010-11-05

Unity 3D + Lua 實作筆記


幾天前實作使用 Lua 當 Untiy 3D 的腳本語言,好處是只要用記事本修改 Lua Script 文字檔就可更改程式執行流程,不用重新編譯程式。這裡使用的方法是將 Lua 以 DLL Plugin 的方式掛在 Unity 3D 裡執行,底下是整個實作的流程 (  iOS 平台的實作請參考另一篇 ) :

1. 重新編譯讓 C# 可以 Import 的 Lua DLL 檔。
因為 C 和 .net 的 calling convention 方式不同以致於需要編譯一個 .net 使用的 calling convention 方式的 DLL 檔,可以參考這篇文章

1.1 到 http://www.lua.org/ftp/ 下載 lua5.1 原始碼,此時的最新版是 lua-5.1.4.tar.gz ,解開後可以看到原始碼在 src 目錄下。

1.2 用 VC 開啟新專案 (Visual C++ 的 Win32 Console Application),Application Type 的部分選擇 DLL,Additional options 的部分選擇 Empty project。

開啟新專案

Application Settings

1.3 引入 src 目錄內的原始檔(除 Makefile、lua.c、luac.c 外)。
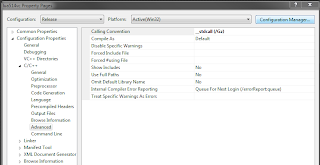
1.4 設定 Calling Convention 為 _stdcall(在 Project Property -> Configuration Properties -> C/C++ -> Advanced -> Calling Convention)。

Calling Convention

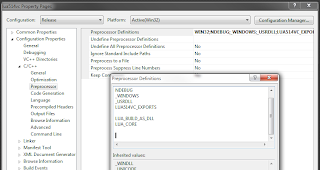
1.5 在 Preprocessor Definitions ( Project Property -> Configuration Properties -> C/C++ -> Preprocessor->Preprocessor Definitions)裡加入 LUA_BUILD_AS_DLL 和 LUA_CORE 兩個定義。
Preprocessor Definitions

1.6 按下 Build 即可產生一個 DLL 檔。

2 將 DLL 檔複製到 Unity3D 專案的 plugins 目錄下 ("\Assets\Plugins"),測試 Lua DLL。

2.1 測試大約區分成三個部分,第一是 "開啟和關閉 Lua" ,第二是 "註冊 C# 的函數給 Lua",第三是 "執行 Lua Script" 並在 Script 內回呼之前註冊的 C# Function。

2.2 "開啟  Lua" 執行如下:
m_luaState = luaL_newstate();
luaL_openlibs(m_luaState);

其中 m_luaState 的定義是:
protected IntPtr m_luaState = IntPtr.Zero;

luaL_newstate() 和 luaL_openlibs() 這兩個函數在執行前須 Import :
[DllImport("lua514vc")] private static extern IntPtr luaL_newstate();
[DllImport("lua514vc")] private static extern void luaL_openlibs(IntPtr lua_State);
其中 lua514vc 是編譯的 Lua 的 DLL 檔名稱。

2.3 "關閉  Lua" 執行如下:
lua_close(m_luaState);

2.4 "註冊 C# 函數",底下是 Lua 註冊 C# Function 的函數:
protected static void lua_register(IntPtr pLuaState, string strFuncName, LuaFunction pFunc)
{
    lua_pushcclosure(pLuaState, pFunc, 0);
    lua_setfield(pLuaState, (int)LuaIndexes.LUA_GLOBALSINDEX, strFuncName);
}

其中 pLuaState 是開啟 Lua 之後取得的 m_luaState,strFuncName 是欲註冊的函數名稱, pFunc 是 C# 函數, LuaFunction 是函數指標,定義如下:
public delegate int LuaFunction(IntPtr pLuaState);

函數 lua_pushcclosure() 和 lua_setfield() 的 Import 方式如下:
[DllImport("lua514vc")]
private static extern void lua_pushcclosure(
    IntPtr lua_State, 
    [MarshalAs(UnmanagedType.FunctionPtr)] LuaFunction func, 
    int n);

[DllImport("lua514vc")]
private static extern void lua_setfield(
    IntPtr lua_State, 
    int idx, 
    string s);

例如現在有一個函數為:
int TestDisplay(IntPtr pLuaState)
{
    Debug.Log("LuaWrapper.TestDisplay()");
    return 0;
}

則註冊 TestDisplay() 函數的方法就是:
lua_register(m_luaState, "TestDisplay", TestDisplay);

2.5 "執行 Lua Script" 檔案:
執行 Lua Script 檔案的函數是:
protected static int luaL_dofile(IntPtr lua_State, string s)
{
    if (luaL_loadfile(lua_State, s) != 0)
        return 1;
 
    return lua_pcall(lua_State, 0, -1, 0);
}

其中 string s 表示 Lua Script 的檔案路徑。函數 luaL_loadfile和 lua_pcall 的 Import 方式為:
[DllImport("lua514vc")]
private static extern int lua_pcall(IntPtr lua_State, int nargs, int nresults, int errfunc);

[DllImport("lua514vc")]
private static extern int luaL_loadfile(IntPtr lua_State, string s);

最後,編輯一個文字檔,儲存檔名為 test.txt,其內容為:
TestDisplay()

然後在 C# 裡執行:
luaL_dofile( m_luaState , "test.txt" );

就會看到 Untiy3D 裡的 Console 視窗出現 "LuaWrapper.TestDisplay()" 字串了。

update 2012-07-05 :
範例程式碼可以在  https://github.com/phardera/unity3d_lua 下載

2010-10-28

Unity 3D 相關筆記

  • 2012-04-30
    • JSON Serializer/Deserializer 參考這篇,程式碼參考這裡
  • 2012-04-13
    • Unity3D 卸載未使用的資源指令 : Resources.UnloadUnusedAssets()
  • 2011-02-25
    • Unicode CJK (中文, 日文, 韓國) 字元範圍,參考這篇文章
  • 2010-12-13
    • Unity 3D 執行順序 (Link)
  • 2010-11-02
    • 以 DllImport 方式把 Lua 嵌在 C# 裡(適用於 Unity3D),參考這篇文章
  • 2010-10-28
    • 利用 Command 建立 AssetBundle 參考這篇討論。
    • 執行時期載入程式碼參考這篇討論。

2010-10-11

HTML Browser in Unity 3D

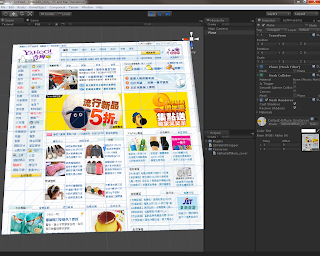
採用 Qt 裡的 WebKit 來瀏覽網頁並把網頁畫成 Image 之後由 Unity 3D 繪出。

yahoo 首頁

Youtube 播放影片

GoogleMaps

QtWebKit 可由 Qt SDK 取得並編譯成 DLL 檔,但 WebKit DLL 沒辦法直接由 Unity 3D 來呼叫使用,因此在 Unity 3D 和 WebKit DLL 中間再寫一個函數對應的 DLL,整個結構大概如下:


2010-09-03

C# firestream 讀檔、struct 和 byte 之間的轉換

using System.IO;
using System.Runtime.InteropServices;
using System;
 
//1. 把檔案讀成 Byte 形式
private byte[] readFile(string strFileName)
{
 
    byte[] buffer = null;
    FileStream fs = new FileStream(strFileName, FileMode.Open, FileAccess.Read);
    try
    {
        BinaryReader br = new BinaryReader(fs);
        int len = System.Convert.ToInt32(fs.Length);
 
        buffer = br.ReadBytes(len);
 
    }
    finally
    {
        fs.Close();
    }
    return buffer;
}
 
//2. struct 轉成 byte
static byte[] StructToBytes(object structObj)
{
    int size = Marshal.SizeOf(structObj);
    IntPtr buffer = Marshal.AllocHGlobal(size);
    try
    {
        Marshal.StructureToPtr(structObj, buffer, false);
        byte[] bytes = new byte[size];
        Marshal.Copy(buffer, bytes, 0, size);
        return bytes;
    }
    finally
    {
        Marshal.FreeHGlobal(buffer);
    }
}
 
//3. byte 轉成 struct
static object BytesToStruct(byte[] bytes, Type strcutType)
{
    int size = Marshal.SizeOf(strcutType);
    IntPtr buffer = Marshal.AllocHGlobal(size);
    try
    {
        Marshal.Copy(bytes, 0, buffer, size);
        return Marshal.PtrToStructure(buffer, strcutType);
    }
    finally
    {
        Marshal.FreeHGlobal(buffer);
    }
}

2010-09-02

Unity 3D 隱藏視窗外框

Unity3D 若要客製化視窗的外框,就本人所知的方法為:

1. 隱藏原本的視窗外框
2. 在視窗內畫出客製作的視窗外框

這邊概述隱藏視窗外框的方法:
1. 編譯一個 DLL 檔(目的用來呼叫 WIN32 API),DLL 檔內提供一個隱藏視窗的函數 HideWindow() 如下:
int __declspec(dllexport) __stdcall HideWindow()
{
 //finde window
 HWND hWin =GetActiveWindow();
 if (hWin ==0)
  return 0;

 RECT rc;
 GetClientRect(hWin, &rc);

 long lStyle =GetWindowLong(hWin, GWL_STYLE);
 lStyle =lStyle & (~WS_CAPTION);
 SetWindowLong( hWin, GWL_STYLE, lStyle);
 
 SetWindowPos(hWin, NULL, 0, 0, rc.right, rc.bottom, SWP_NOMOVE);

 return 2;

}
2. 將編譯出來的 DLL 檔加至 Project 的 plugin 目錄下。

3. 在 Unity3D 裡建立一個 C# Script,並在裡面加入,其中 winframehidden 為 DLL 檔名:
[DllImport("winframehidden")]
private static extern int HideWindow();

然後在 Start() 函數內呼叫 HideWindow() 即可。

2010-08-31

擷取 std::cout 字串

std::cout 方便我們把資料列印到 console 視窗,擷取這些字串可以拿來做其它用途,例如另存成 Log file、以其它方式顯示等...。底下的方法是當 cout 呼叫時, 會將 cout 的字串以 callback 的方式傳給 callback function。

1. 建立 cout wrapper class 繼承
std::basic_streambuf< char, std::char_traits< char > >

2. 在 class 的 constructor 加入(其中  m_pBuf 為暫存的 cout buffer):
m_pBuf = std::cout.rdbuf( this );

3.在 class 的 destructor 加入下列(還原原來的 cout buffer):
m_Stream.rdbuf( m_pBuf );

4. 利用此 class override 兩個 function 分別為 xsputn 及 overflow:
/**
* Override xsputn and make it forward data to the callback function.
*/
std::streamsize xsputn( const char* _Ptr, std::streamsize _Count )
{
 m_pCbFunc( _Ptr, _Count ); //m_pCbFunc 為使用者定義的 callback function
 return _Count;
}

/**
* Override overflow and make it forward data to the callback function.
*/
std::char_traits< char >::int_type overflow( std::char_traits< char >::int_type v )
{
 char ch = std::char_traits< char >::to_char_type( v );
 m_pCbFunc( &ch, 1 ); //m_pCbFunc 為使用者定義的 callback function

 return std::char_traits< char >::not_eof( v );
}

5. 程式建立此 class 之後,所有的 cout 呼叫都會將字串以 callback 方式傳給使用者定義的 callback function 了!

2010-08-25

在 Unity 3D 裡用 C# Script 產生 Mesh

首先建立一個 C# Script,這裡取名為 SimpleRect.cs,其內容如下(特別注意的是 class name 必須與檔名相同):
using UnityEngine;
using System.Collections;

public class SimpleRect : MonoBehaviour {

    // Use this for initialization
    void Start () {

        Mesh pm = new Mesh();
        pm.Clear();
        
        Vector3[] verts = new Vector3[4];
        verts[0].x = -0.5f;
        verts[0].y = 0.0f;
        verts[0].z = 0.5f;

        verts[1].x = 0.5f;
        verts[1].y = 0.0f;
        verts[1].z = 0.5f;

        verts[2].x = -0.5f;
        verts[2].y = 0.0f;
        verts[2].z = -0.5f;

        verts[3].x = 0.5f;
        verts[3].y = 0.0f;
        verts[3].z = -0.5f;
        pm.vertices = verts;

        int[] tris = new int[6];

        tris[0] = 0;
        tris[1] = 1;
        tris[2] = 2;
        
        tris[3] = 2;
        tris[4] = 1;
        tris[5] = 3;

        pm.triangles = tris;

        pm.RecalculateBounds();
        pm.RecalculateNormals();

        pm.Optimize();

        //建立 GameObject, 並指定 MeshFilter 的 Mesh:
        GameObject go = new GameObject();
        MeshFilter mf = go.AddComponent<meshfilter>();
        mf.mesh = pm;

        MeshRenderer mr = go.AddComponent<meshrenderer>(); 
    }

    // Update is called once per frame
    void Update () {

    }
}

082501
將 SimpleRect.cs 從 Project 拖移至 Hierarchy 視窗的 MainCamera 上


082502
點選 MainCamera 時,可看到 Inspector 裡多了 SimpleRect 的 Script


082503
此時進入 GameMode 就可以看到產生的 Rect

2010-08-10

Gamma 值的筆記

  1. PC 用的 Gamma 值多為 2.2,MAC 用的 Gamma 值為 1.8。
  2. Gamma 值套用到方程式 f(x) =pow(x, G), 其中 x 為顏色, G 為 Gamma 值。
  3. PC 螢幕顯示出來的顏色都會套用 Gamma 值 2.2,所以存在硬碟裡的圖片若是原圖(Gamma 1.0),則會偏黑。為了顯示正常的圖,儲存在硬碟裡的圖必須比較亮(Gamma 0.45)。
  4. 所有在硬碟裡的圖及乎都比較亮。(特殊圖檔除外,例:raw 檔...)
  5. 圖片計算光照的順序依序為:將圖片從硬碟取出,套用 Gamma 2.2 之後再計算光源,計算完成後套用 Gamma 0.45 ,然後再丟給螢幕顯示出來。
  6. 注意圖片取樣及寫入 framebuffer 時,硬體是否已自動做 Gamma 修正。

2010-08-05

2010-08-02

Sprite Manager for Unity3D

花兩週的時間寫一個視覺化的 Sprite 編輯器:


編輯器介面


在時間軸上新增 Sprite 圖層並設定好 keyframe 之後就可以可以編輯圖片大小, 位置, 旋轉角度, 透明度, 播放第幾個 Sprite 圖, 並且在各個 keyframe 之間自動內插產生動畫。

編輯器裡比較特殊的控制項為 時間軸控制項和編輯區域的控制項,因為 unity 沒有這些控制項,所以要自己刻出來,比較辛苦:


時間軸控制項

時間軸控制項的各個圖層皆代表一個 Sprite 圖, 深藍色的色塊代表 keyframe, 淺藍色的色塊代表自動內插並顯示的 frame,最上面的刻度軸代表目前的 frame, 紅色垂直線表示目前顯示的 frame。

編輯區控制項則是顯示及編輯目前 keyframe 裡的圖片,深藍色框線是目前遊戲的解析度,當時間軸的紅線移到內插的 frame 時, 它會及時顯示內插的結果。

接著要做的是, 滑鼠在某個 Sprite 上按下時, 產生按鈕的事件, 讓它除了能編輯 Sprite 動畫外, 還能當成基本的 GUI 編輯器。


2010-06-25

2010-06-22

C# 的執行緒同步

用 C++ 寫多執行緒同步程式時常用到的功能有 InterlockedIncrement、CRITICAL_SECTION 和 Semaphore,其對照在 C# 下的使用方式為:

1. InterlockedIncrement

    C++ 的用法如下:
    UINT nCt =0;
    InterlockedIncrement( &nCt );

    C# 的用法如下:
    int nCt =0;
    System.Threading.Interlocked.Increment( ref uCt );

2. CRITICAL_SECTION

    C++ 的用法如下:
    CRITICAL_SECTION g_cs;
    EnterCriticalSection( &g_cs );
    {
        //...
    }
    LeaveCriticalSection( &g_cs );

    C# 的用法如下:
    Object cs = new Object();
    lock (cs)
    {
        //...
    }

3. Semaphore

    C++ 的用法如下:
    HANDLE m_Handle =CreateSemaphore( NULL, 1, 1, L"SemaphoreName" );
    WaitForSingleObject( m_Handle, nWaitTime );
    {
        //...
    }
    ReleaseSemaphore( m_Handle, 1, NULL );
    CloseHandle( m_Handle );

    C# 的用法如下:
    private static AutoResetEvent m_Handle =new AutoResetEvent( true );
    m_Handle.WaitOne();
    {
        //...
    }
    m_Handle.Set();

2010-06-17

C# 的 delegate

delegate 大致類似 C++ 的函數指標。

C++ 的用法如下:

void ShowPercentage( int nPercentage );
typedef void (* CALLBACK) (int);
CALLBACK =showPercentage;

呼叫 ShowPercentage 函數:
CALLBACK( 100 );

ShowPercentage( 100 );


C# 的用法如下:

void ShowPercentage( int nPercentage );
delegate void ShowPercentageDelegate( int nPercentage );
ShowPercentageDelegate CALLBACK = ShowPercentage;

呼叫 ShowPercentage 函數:
CALLBACK( 100 );

ShowPercentage( 100 );

2010-06-01

Collada 模型檢視器 + 擴增實境 AR


HK416

Robot

F430

A6M3

SBD3

Titanic

Taipei 101

YZF-R1


小弟利用工作閒餘寫了一個具有擴增實境 (AR) 的 Collada 模型檢視器, 主要開啟的是 Google 3D Warehouse 裡的 collada 模型, render 的部分接下來會增強光線和陰影效果 (例如 HDR, SSAO 之類的), 但想要問各位對程式接下去的發展有沒有什麼建議 ? (例如增加場景編輯, 物理運算, 人物遊覽場景, 寵物飼養等....,)

程式下載

ps. 

  1. 因為用 media foundation library 來擷取 webcam 畫面, 所以程式目前只能在 vista 或 win7 上跑, 過些時候再把 xp 的版本放上來.
  2. 執行路徑在 bin/DAELoader.exe
  3. 從 3D warehouse 下載的 Collada 檔為 zip 格式, 將它解壓縮之後可以在 models 目錄下找到副檔名 dae 的檔案, 開啟此檔即可載入模型.
  4. 將副檔名 dae 檔關聯到 DAEViewer.exe, 以後只要連點 dae 檔, 系統就會自動呼叫 DAEViewer 來開啟之.

2010-05-12

boost 編譯筆記

1.編譯bjam
利用Visual Studio Command Prompt開啟DOS視窗,將目錄 cd 到 C:\boost_1_34_1\tools\jam\src下,執行build.bat,然後會在C:\boost_1_34_1\tools\jam\src\bin.ntx86\產生bjam.exe,將bjam.exe複製到c:\boost_1_34_1\下。

2.修改user-config.jam
(C:\boost_1_34_1\tools\build\v2\user-config.jam) 的MSVC configuration,以 vc9 為例

msvc (default version
# -------------------
# MSVC configuration.
# -------------------
# Configure
, searched for in standard locations and PATH).
# using msvc ;
# Configure specific msvc version (searched for in standard locations and PATH).
# using msvc : 8.0 ;
using msvc : 9.0 : : /wd4819 /D_CRT_SECURE_NO_DEPRECATE /D_SCL_SECURE_NO_DEPRECATE /D_SECURE_SCL=0 /D_ITERATOR_DEBUGGING=0 ;

3.編譯boost
bjam --toolset=msvc-9.0 --build-type=complete install

2010-05-10

Media Foundation + ARToolkit + OpenGL

ARToolkit 裡面已經有DSVL影像擷取相關函式庫,此函式庫利用 DirectShow 來擷取影像,因此若要用 VC10 來編譯 DSVL,另外需要再安裝 Windows2003 SDK,這邊我用 Media Foundation 的 Video Capture 功能來取代 DSVL,Media Foundation 是設計來取代 DirectShow 的新一代技術。
Media Foundation 的 Video Capture 程式碼可以參考 MFCaptureD3D Sample,其 device.cpp 裡 DrawDevice::DrawFrame() 函數負責將擷取的影像轉換成 RGB32 (A8R8G8B8) 格式再用 DirectX 畫出,我們可以直接利用此函數轉換完成之後的 RGB32 影像來做影像辨識。
ARToolkit 的辨識功能函數 arDetectMarker() 讀取的影像格式為 (A8R8G8B8) 剛好與 DrawFrame() 函數裡轉換後的影像格式相同,因此直接將影像餵給 arDetectMarker() 即可得到辨識結果。 OpenGL 則要稍微做一點小變化來讀取 ARGB 格式影像:

圖片更新時(擷取到新的影像):
glTexSubImage2D (GL_TEXTURE_2D, 0, 0, 0, 640, 480, GL_BGRA, GL_UNSIGNED_INT_8_8_8_8_REV, m_pBuffer);

2010-05-03

解讀 3d warehouse collada 檔案

Collada 模型檔是以 xml 格式的方式儲存,可以用 Collada-DOM 或是 FCollada 之類的 library 來幫忙解讀, 這邊我是參考這個 viewer ( ColladaLoader ),從原始碼可以學到如何用 FCollada 來解讀 Collada 檔案(包含半透明物件的順序排列),然後以 OpenGL 呈現結果,但值得注意的是它並沒有解讀有關 FaceCulling 的資料,所以...

  1. 如果對全部的三角形 cull back face,那麼在有些角度下,模型會有殘缺不全的現象。
  2. 如果關閉 culling 功能,在某些情況下(lighting...),也會造成不正確的結果。
以 3d warehouse 的 Collada 檔案為例,可以從它檔案裡的 < double_sided >標籤來分辨是否要對這個面進行 culling,如此就可以正確解讀 3d warehouse 裡的 collada 檔案了!