2012-07-03

Unity 3D 列出 AssetBundle 內容

AssetBundle.LoadAll 指令取得的資料型態是 Object[] ,利用 C# Reflection 功能可以把它轉回原型並取得其中某個成員 (Property value) 的值。程式碼列出如下:
[MenuItem("Assets/Get Content List of Assetbundle")]
static void ListABContent()
{
    string strPath = EditorUtility.OpenFilePanel(
            "Open AssetBundle...", 
            Application.dataPath, 
            "unity3d");
    if (System.IO.File.Exists(strPath) == true)
    {
        WWW fileLoader = new WWW("file://" + strPath);
        object[] content = fileLoader.assetBundle.LoadAll();
 
        Debug.Log("total objects =" + content.Length);
 
        for (int i = 0; i < content.Length; ++i)
        {
            System.Type objType = content[i].GetType();
            System.Reflection.PropertyInfo objProperty = 
                objType.GetProperty("name");
 
            string objName = "<error>";
            try
            {
                objName = (string)objProperty.GetValue(content[i], null);
            }
            catch
            {
            }
 
            Debug.Log(
                "obj[" + i + "] : type="+objType.Name+", name=" + objName
                );
 
        }
 
        fileLoader.assetBundle.Unload(true);
        fileLoader.Dispose();
    }
    else
        Debug.LogError("file not found");
 
}

把程式碼儲存在 C# Script,並置於 Editor 目錄之下,沒問題的話,功能表的 Assets 之下會多出一項 "Get Content List of Assetbundle",點擊之後選擇 Assetbundle 檔案,console 視窗將列出此 assetbundle 之下所有物件的型態 (Type) 及其名稱 (name)。

底下另外註記呼叫成員函數 (invoke method) 的方法:( 假設取得的 object 為 Texture2D,則呼叫其 GetPixels Method 的方法)

System.Reflection.MethodInfo GetPixels_Default = 
    objType.GetMethod("GetPixels", new System.Type[0]);
System.Reflection.MethodInfo GetPixels_Mipmap =
    objType.GetMethod("GetPixels", new System.Type[1] {typeof(int)});
Color[] retPixels;
retPixels =(Color[])GetPixels_Default.Invoke(content[i], null);
retPixels = (Color[])GetPixels_Mipmap.Invoke(content[i], new object[1] { 0 });

2012-05-20

Unity 3D 產生 Texture Atlas

使用 Unity3D  內建的 Texture2D.PackTextures 功能來產生 Texture Atlas 圖片,下面是簡單的範例 :

Texture2D texAtlas =new Texture2D(2048, 2048);
Rect[] arrRc =texAtlas.PackTextures(arrTexSrc, 1);

arrTexSrc 是一個 Texture2D[] 型態的變數,texAtlas.PackTextures 將 arrTexSrc 矩陣裡所有的 Texutre 打包在同一張 Texture ( texAtlas ),並回傳所有被打包的圖片在 texAtlas 的 uv 座標位置 (  arrRc )。

arrTexSrc 的取得方式參考範例 :

Object[] arrFoundTex =Selection.GetFiltered(typeof(Texture2D), SelectionMode.DeepAssets);

將取得的 arrFoundTex 轉成 Texture2D[] 型態變數後丟給 PackTextures 使用。
底下的範例是將 Texture2D 另存成 PNG 格式圖檔 :

byte[] bytedata = texAtlas.EncodeToPNG();
if (bytedata != null)
    System.IO.File.WriteAllBytes(strPath, bytedata);

其中 strPath 是檔案路徑,取得的方式參考 :

string strPath =EditorUtility.SaveFilePanel("Save Texture Atlas...", Application.dataPath, Selection.activeObject.name, "png");

此外值得注意的是,欲打包的圖片在 TextureImporter 必須打開 Read/Write Enabled 設定 ( Texture Type 選擇  Advanced )


2012-04-25

iOS 內建字型

參考這篇文章,iOS 內建的字型列出如下 :

Family name: Hiragino Kaku Gothic ProN W3
    Font name: HiraKakuProN-W3

Family name: Courier
    Font name: Courier
    Font name: Courier-BoldOblique
    Font name: Courier-Oblique
    Font name: Courier-Bold

Family name: Arial
    Font name: ArialMT
    Font name: Arial-BoldMT
    Font name: Arial-BoldItalicMT
    Font name: Arial-ItalicMT

Family name: STHeiti TC
    Font name: STHeitiTC-Light
    Font name: STHeitiTC-Medium

Family name: AppleGothic
    Font name: AppleGothic

Family name: Courier New
    Font name: CourierNewPS-BoldMT
    Font name: CourierNewPS-ItalicMT
    Font name: CourierNewPS-BoldItalicMT
    Font name: CourierNewPSMT

Family name: Zapfino
    Font name: Zapfino

Family name: Hiragino Kaku Gothic ProN W6
    Font name: HiraKakuProN-W6

Family name: Arial Unicode MS
    Font name: ArialUnicodeMS

Family name: STHeiti SC
    Font name: STHeitiSC-Medium
    Font name: STHeitiSC-Light

Family name: American Typewriter
    Font name: AmericanTypewriter
    Font name: AmericanTypewriter-Bold

Family name: Helvetica
    Font name: Helvetica-Oblique
    Font name: Helvetica-BoldOblique
    Font name: Helvetica
    Font name: Helvetica-Bold

Family name: Marker Felt
    Font name: MarkerFelt-Thin

Family name: Helvetica Neue
    Font name: HelveticaNeue
    Font name: HelveticaNeue-Bold

Family name: DB LCD Temp
    Font name: DBLCDTempBlack

Family name: Verdana
    Font name: Verdana-Bold
    Font name: Verdana-BoldItalic
    Font name: Verdana
    Font name: Verdana-Italic

Family name: Times New Roman
    Font name: TimesNewRomanPSMT
    Font name: TimesNewRomanPS-BoldMT
    Font name: TimesNewRomanPS-BoldItalicMT
    Font name: TimesNewRomanPS-ItalicMT

Family name: Georgia
    Font name: Georgia-Bold
    Font name: Georgia
    Font name: Georgia-BoldItalic
    Font name: Georgia-Italic

Family name: STHeiti J
    Font name: STHeitiJ-Medium
    Font name: STHeitiJ-Light

Family name: Arial Rounded MT Bold
    Font name: ArialRoundedMTBold

Family name: Trebuchet MS
    Font name: TrebuchetMS-Italic
    Font name: TrebuchetMS
    Font name: Trebuchet-BoldItalic
    Font name: TrebuchetMS-Bold

Family name: STHeiti K
    Font name: STHeitiK-Medium
    Font name: STHeitiK-Light

2012-04-24

Unity 3D 在 iOS 上顯示中文字串


之前使用 Unity3D 寫遊戲程式都是以 Dynamic Font 功能來顯示中文字串,最近才發現這功能不支援 iOS,因此若要在 iOS 上使用 Dynamic Font 就得自己做了,幸運的是實作起來並不複雜,底下敘述如何將中文字串轉成圖片 ( Texture2D ) 的方法 : ( 概略是利用 iOS 內建的 Font Renderer 先把字串畫在主記憶體裡,再利用 OpenGL 指令將記憶體裡字串的圖片轉成貼圖 )

全部範例檔案有三個 :
1. main.cs
    a. 放在 Assets 目錄底下
    b. 此 Script 依附在 Main Camera 上

2. dynaFont.cs
    a. 放在 Assets/Plugins 目錄底下
    b. 此檔案為 unity3d 內部 script 與 plugin 之間的介面

3. dynaFont.m
    a. 放在 Assets/Plugins/iOS 目錄底下 (轉成 xcode project 時將自動引入)
    b. 不需事先編譯

首先看 main.cs 檔案內容 :


using UnityEngine;
using System.Collections;

public class main : MonoBehaviour {

    // Use this for initialization
    void Start ()
    {
        int nWidth =128;
int nHeight =128;

        //產生 128x128 (注意大小為2冪次方)之 texture
Texture2D tex =
            new Texture2D(
                nWidth, 
                nHeight, 
                TextureFormat.Alpha8
                false);

        //把中文字畫在 texture 上
        genTexture(
            tex.GetNativeTextureID(), 
            "中文測試"
            "Arial"
            10
            128
            128);
}
}


dynaFont.cs 檔案內容如下 :


using UnityEngine;
using System.Collections;
using System.Runtime.InteropServices;
//
//此為 unity3d 內部程式呼叫外部 plugin 函數之間的介面
//
public class dynaFont
{
    //指示 getTexture 為外部 plugin 函數
  [DllImport("__Internal")]
  public static extern bool genTexture(
        int nTexID, 
        string strText, 
        string strFontName, 
        int nFontSz, 
        int nTexWidth, 
        int nTexHeight);
}


dynaFont.m 檔案內容如下 :


#import <Foundation/Foundation.h>
//
// 將 char 指標 (對應 C# 的 string) 轉成 iOS 字串格式 (NSString)
//
NSString* dynaFont_GetString(const char* pChar)
{
  if (pChar ==NULL)
      return [NSString stringWithUTF8String:""];
return [NSString stringWithUTF8String:pChar];
}


//
// 利用 NSString 的 drawInRect 畫出字串後再以 glTexImage2D 產生貼圖
//
bool genTexture( int nTexID, 
                 const char* pStrText, 
                 const char* pStrFontName, 
                 int nFontSz, 
                 int nTexWidth, 
                 int nTexHeight)
{
    unsigned char* pData =
        (unsigned char*)calloc(nTexWidth, nTexHeight);

    CGColorSpaceRef pcs =CGColorSpaceCreateDeviceGray();
    CGContextRef pcon =
        CGBitmapContextCreate(
            pData, 
            nTexWidth, 
            nTexHeight, 
            8
            nTexWidth, 
            pcs, 
            kCGImageAlphaNone);
    CGColorSpaceRelease(pcs);

    if (!pcon)
    {
      free(pData);
      return false;
    }
    else
    {
      CGContextSetGrayFillColor(pcon, 1.0f, 1.0f);

    CGSize rc =CGSizeMake(nTexWidth, nTexHeight);
    UIFont* pf =
            [ UIFont
              fontWithName:dynaFont_GetString(pStrFontName) 
              size:nFontSz];

    UIGraphicsPushContext(pcon);
        [ dynaFont_GetString(pStrText)
          drawInRect:CGRectMake(0,0,rc.width, rc.height) 
          withFont:pf lineBreakMode:UILineBreakModeWordWrap 
          alignment:UITextAlignmentLeft];
    UIGraphicsPopContext();

    glBindTexture(GL_TEXTURE_2D, nTexID);
    glTexImage2D(
            GL_TEXTURE_2D, 
            0
            GL_ALPHA, 
           (GLsizei)nTexWidth, (GLsizei)nTexHeight, 
            0
            GL_ALPHA, 
            GL_UNSIGNED_BYTE, 
            pData);
    CGContextRelease(pcon);

    free(pData);
    }
    return true;
}


2012-04-14

關於 iOS 開發環境設定的兩三事

2012-04-14 :
  1. 若是使用自己的 apple id 取得 ios developer program 則直接參考 此聯結 做設定。
  2. 若是某人已取得 ios developer program ,要讓自己也可以開發 ( 不同/或相同的電腦,作業系統裡使用不同的使用者帳號名稱 ),則按下列步驟設定 :
    • 使用已取得 ios developer program 的 apple id 到此頁面,按下 invite person ,邀請自己,按下後自己將收到邀請函,按下邀請函上面的連結之後,會開啟網頁詢問是否已有 apple id,若已有 apple id,登入過後就會發現自己的 apple id 也加入 ios developer program 了。
    • 以自己的  apple id 參考 此聯結 做後續設定。
  3. ( 尚未測試 ) 若是某人已取得 ios developer program,後來再買了一台電腦,想要在另一台電腦上也可以開發 ( 不同的電腦,作業系統裡使用相同的使用者帳號名稱 ) ,則按下列步驟設定 :
    • 至 applications > utilities >  Keychain Access 選擇左下方 ‘Keys’ 。
    • 找到具有 iOS Development Certificate 的 private key,按下右鍵 (control +左鍵) 選 export ...。最後會得到一個 (.p12) 的檔案。
    • 將檔案複製在另一台電腦並安裝之。
    • 參考 此聯結 並跳至第六項之後做後續設定。
  4. 因為 Snow Leopard 上的 xcode 只到 4.2 版就沒有再更新了,因此若手機上的 iOS 是 5.1 版,則要升級作業系統至 Lion ( 才可安裝 xcode 4.3 以上版本) 或將手機 iOS 降級至 5.0 才可讓 xcode 支援使用。若不想升級作業系統或降級 iOS,還是可以按照下列步驟將 iOS 5.1 SDK 強制安裝至 xcode 4.2 (參考 此聯結 ) :
    • 這裡 下載最新版 xcode。
    • 進入 terminal (applications > utilities > terminal ),依序輸入下列指令 ( 此指令是針對 xcode 4.2 安裝至 /Developer )
sudo cp -R /Volumes/Xcode/Xcode.app/Contents/Developer/Platforms/iPhoneOS.platform/Developer/SDKs/iPhoneOS5.1.sdk /Developer/Platforms/iPhoneOS.platform/Developer/SDKs/
sudo cp -R /Volumes/Xcode/Xcode.app/Contents/Developer/Platforms/iPhoneSimulator.platform/Developer/SDKs/iPhoneSimulator5.1.sdk /Developer/Platforms/iPhoneSimulator.platform/Developer/SDKs/
sudo cp -R /Volumes/Xcode/Xcode.app/Contents/Developer/Platforms/iPhoneOS.platform/DeviceSupport/5.1\ \(9B176\) /Developer/Platforms/iPhoneOS.platform/DeviceSupport/
sudo rm -f /Developer/Platforms/iPhoneOS.platform/DeviceSupport/Latestcd /Developer/Platforms/iPhoneOS.platform/DeviceSupport/
sudo ln -s ./5.1\ \(9B176\) ./Latest

2012-04-06

NodeJS 執行時期更新程式碼

這是一個很酷的特性!nodejs 在執行期間不必重新啟動就可以更新程式碼!例如有個用 nodejs 寫的 http / socket server 正在執行當中,現在要為它修改或是增加新的功能,則直接修改程式碼後儲存,完全不必重新啟動伺服器。
底下是一個簡單的範例,把 main.js 執行起來,它會監控 module0.js ,並定時呼叫 module0.js 的 say function ,當 module0.js 更動後(例如更改 say funciton 裡要顯示出的字串),它會自動重新載入 module0.js 的程式碼:

檔案 main.js :
var l_module =require('./module0');
var l_fs =require('fs');

l_fs.watch('module0.js',
    function(event, pFilename)
    {
        console.log('new event='+event+', filename='+pFilename);
        if (event ==='change')
        {
            var name =require.resolve('./module0');
            delete require.cache[name];
            console.log('resolved modulename ='+name);
               
            try
            {
                l_module =require('./module0');               
            }
            catch(err)
            {
                console.log(err);
                l_module =undefined;
            }
        }
    }
);

var dosomething =
    function()
    {
        if (l_module !==undefined &&
            l_module.hasOwnProperty('say')===true)
        {
            l_module.say();
        }
        else
        {
            console.log('module unavailable');
        }
       
        setTimeout(dosomething, 1000);
    };
   
setTimeout( dosomething, 1000 );


檔案 module0.js :
exports.say =
    function()
    {
        console.log('im module0 -version 0');
    };

2012-03-28

2.x 以後的 connect 把 router 功能移除

參考討論串 https://github.com/senchalabs/connect/issues/262,作者將 router 功能歸類在更上層的 express ,因此 connect 不再維護/提供 router 的功能了,若要繼續使用新版的 connect ,其原本 router 的功能可以從這裡 https://github.com/DamonOehlman/connectables 取得!經過測試,在 node 0.6.14 及 connect 2.0.3 上可正常使用!

2012-03-06

linux / osx 指令筆記

顯示程式需要的 library
readelf -d <file> | grep -i shared

iptables 將 port 從 443 導到 5200
iptables -t nat -A PREROUTING -i eth0 -p tcp --dport 443 -j REDIRECT --to-port 5200
(刪除)
iptables -t nat -D PREROUTING -i eth0 -p tcp --dport 443 -j REDIRECT --to-port 5200
查看 iptables port forward 之設定
iptables -t nat -L -n -v

將 ssh public key 加入到對方電腦的 authorized_keys 裡
cat .ssh/id_rsa.pub | ssh b@B 'cat >> .ssh/authorized_keys'

查詢某檔案或某資料夾 (包含其子資料夾) 之佔用的硬碟空間
du -sh ./file_or_dir

透過 SSH 遠端執行指令 "pwd; ls;"
ssh -l user0 ip0 -p port "pwd; ls;"

SSH Tunnel 建立通道 (在 ip0 建立通道,讓輸入指令端可以透過 ip0 連線至 TARGET_IP) :
ssh -N -L localhost:2222:TARGET_IP:TARGET_PORT user0@ip0

SSH Tunnel 建立通道 (此時在 ip0 可以透過 2222 連回輸入指令端):
ssh -R 2222:localhost:22 user0@ip0 -p port0

建立 socks5 (3128) 通道:
SSH Tunnel 建立後 (此時應已進入 ip0:port0 ) 再輸入 :
ssh -p 2222 -D 3128 user1@localhost

OSX 開啟/關閉 apache2:
sudo apachectl start
sudo apachectl stop

OSX 開啟/關閉 postfix:
sudo launchctl start org.postfix.master
sudo launchctl stop org.postfix.master

同步/更新時間:
ntpdate pool.ntp.org

mac port 一些指令:
1) port selfupdate 檢查更新
2) port installed 檢查已安裝項目
3) port search [item] 搜尋可安裝項目 (例 port search nodejs)
4) port install [item] 安裝項目
5) port uninstall [item] 反安裝項目
6) port upgrade outdated 更新已安裝的套件

OSX Finder 顯示隱藏檔案及資料夾:
1) defaults write com.apple.Finder AppleShowAllFiles TRUE
2) killall Finder

OSX Finder 不顯示隱藏檔案及資料夾:
1) defaults write com.apple.Finder AppleShowAllFiles FALSE
2) killall Finder

screen
1) screen -m -d -S <ScreenName> <Command> 背景開新的 screen 並執行程式
2) screen -ls 列出目前所有 screen 狀態
3) Control+A 放開再按 D 跳離 screen
4) Control+A 放開再按 Esc 上下捲動 Screen

設定日期
date -s "2 OCT 2006 18:00:00"

更改 ulimit -n 之預設上限
1. 編輯檔案 /etc/security/limits.conf , 在結尾新增 :
* soft nofile 50240
* hard nofile 50240
2. reboot

ubuntu 新增 user
sudo adduser <username>

ubuntu 設定 user 為管理者
sudo adduser <username> admin

OSX 顯示目前正在等待連線的 TCP Port
sudo lsof -nP -iTCP -sTCP:LISTEN

MacPort 使用 http 更新 :
修改檔案 /opt/local/etc/macports/sources.conf
將原本的 [default] 那一行改成
http://www.macports.org/files/ports.tar.gz [default]
最後使用指令
cd /opt/local/etc/macports/ && sudo port -d sync && sudo portindex
ref : https://destefano.wordpress.com/2011/03/18/macports-behind-a-proxy/


2011-12-13

lua and 64bit integer

lua 的整數運算很不幸的,只有到 32bit 的範圍(-2,147,483,648 ~ 2,147,483,647),但透過 lnum 之 patch 之後,可支援到 64bit(-9,223,372,036,854,775,808 ~ 9,223,372,036,854,775,807)底下是 patch 之過程的記錄:

1. 到 這裡 取得 Lua 5.1.4 原始碼。
2. 到 這裡 取得 lua514-lnum-20090417.patch.tgz。
3. 執行 patch 指令 
    a. linux or mac :  
        i. 解壓解 lua 5.1.4 及 lua514-lnum-20090417.patch.tgz
        ii. 把 lua514-lnum-20090417.patch  擺在 lua 5.1.4 之 src 目錄下
        ii. 進到 lua src 檔目錄下
        iii. 執行 patch < lua514-lnum-20090417.patch
    b. windows :
        i. 到 這裡 下載 patch 執行檔
        ii. 解壓解 lua 5.1.4 及 lua514-lnum-20090417.patch.tgz
        ii. 把 lua514-lnum-20090417.patch 和 patch.exe  擺在 lua 5.1.4 之 src 目錄下
        ii. 進到 lua src 檔目錄下
        iii. 假如使用的是 win7, vista 作業系統,須把 patch.exe 改成其它名稱(例如 cc.exe)
        iv. 執行 patch < lua514-lnum.patch(或者 cc < lua514-lnum.patch)
        v. 假如顯示 Assertion failed: hunk, file ../patch-2.5.9-src/patch.c, line 354…訊息: 
            1. 執行 write lua514-lnum-20090417.path
            2. 將會跳出 wordpad 視窗,此時直接按存檔並離開
            3. 重新執行 iv 指令
4. 開啟 luaconf.h,找到下列關鍵字:

/*
@@ LNUM_DOUBLE | LNUM_FLOAT | LNUM_LDOUBLE: Generic Lua number mode
@@ LNUM_INT32 | LNUM_INT64: Integer type (optional)
@@ LNUM_COMPLEX: Define for using 'a+bi' numbers
@*
@* You can combine LNUM_xxx but only one of each group. I.e. 'LNUM_FLOAT
@* LNUM_INT32 LNUM_COMPLEX' gives float range complex numbers, with
@* 32-bit scalar integer range optimized.
*/
/*#define LNUM_DOUBLE*/

5. 在關鍵字下一行加入 #define LNUM_INT64
6. 開始編譯(可參考 這篇

redirect git stdout message

假如現在執行一個 git 指令 “git clone git://github.com/joyent/node” 其顯示的訊息(包含檔案下載的進度)為:


最後完成時顯示為:


若要在 C# 執行上述 git 指令,通常使用 System.Diagnostics.Process 來呼叫執行,其程式碼如下:
static void Main(string[] args)
{

    Process myProcess = new Process();
    ProcessStartInfo info = new ProcessStartInfo("git.exe", "clone git://github.com/joyent/node");
    info.CreateNoWindow = true;
    info.UseShellExecute = false;
    info.RedirectStandardOutput = true;
    info.WorkingDirectory = "";
    myProcess.StartInfo = info;
    myProcess.OutputDataReceived += new DataReceivedEventHandler(myProcess_OutputDataReceived);

    myProcess.Start();
    myProcess.BeginOutputReadLine();

    myProcess.WaitForExit();
    myProcess.Close();

}
static void myProcess_OutputDataReceived(object sender, DataReceivedEventArgs e)
{
    if (!String.IsNullOrEmpty(e.Data))
    {
        Console.WriteLine("captured line> "+e.Data);
    }           
}
執行結果為:
由上圖發現執行過程中,只有顯示一行訊息,猜測是因為 git 在執行時期會呼叫其它的 process,而這些 process 所顯示的訊息未被 redirect 到 C#,下圖是 process explorer 在 git 執行時期所擷取的畫面,發現 git 的確產生 child process 來處理其它工作:

因此若要擷取 child process 顯示的訊息,改用下列指令:
cmd.exe /C “git.exe clone git://github.com/joyent/node –progress 2>&1”
程式碼修改為:
ProcessStartInfo info = new ProcessStartInfo("cmd.exe", "/C " + "" + "git.exe clone git://github.com/joyent/node --progress 2>&1" + "");
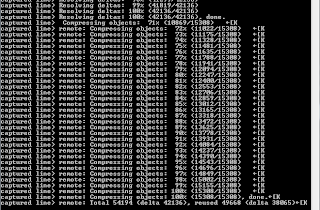
執行結果為:

終於把所有的訊息都 redirect 到 C# 了。