2010-12-31

Windows Message in the Unity3D : Hooks

參考這篇連結,讓 Unity 也可以做 Hook Windows Message 的動作,底下是修改並精簡至 Unity 的範例,範例中的 m_hookType 設定成 WH_KEYBOARD ,所以是 hook 鍵盤的訊息,若要 hook 其它的訊息可以透過修改 m_hookType 來達成,我們可以在 CoreHookProc 處理傳來的鍵盤訊息,使 Unity 做出對應的動作(但要注意的是,呼叫CoreHookProc的 Thread 不是 Unity 的主要 Thread,不能執行非 thread-safe Unity API!)。

大概敘述一下底下範例的使用方法:

1) 建立一個新的 C Sharp Script,取名為 KBHooks,並將範例的程式碼覆蓋進去。
2) 將此 KBHooks.cs 從 Project 拖曳至 Hierarchy 內的 Main Camera 上。
3) 執行。

執行時在鍵盤上敲幾個鍵,離開執行之後會在 Console 視窗看到類似的訊息:


KBHooks.cs:
using UnityEngine;
 
using System;
using System.Collections;
using System.Runtime.InteropServices;
 
public class KBHooks : MonoBehaviour
{
    [DllImport("user32")]
    protected static extern IntPtr SetWindowsHookEx(
        HookType code, HookProc func, IntPtr hInstance, int threadID);
 
    [DllImport("user32")]
    protected static extern int UnhookWindowsHookEx(
        IntPtr hhook);
 
    [DllImport("user32")]
    protected static extern int CallNextHookEx(
        IntPtr hhook, int code, IntPtr wParam, IntPtr lParam);
 
    [DllImport("Kernel32")]
    protected static extern uint GetLastError();
 
    // Hook Types
    protected enum HookType : int
    {
        WH_JOURNALRECORD = 0,
        WH_JOURNALPLAYBACK = 1,
        WH_KEYBOARD = 2,
        WH_GETMESSAGE = 3,
        WH_CALLWNDPROC = 4,
        WH_CBT = 5,
        WH_SYSMSGFILTER = 6,
        WH_MOUSE = 7,
        WH_HARDWARE = 8,
        WH_DEBUG = 9,
        WH_SHELL = 10,
        WH_FOREGROUNDIDLE = 11,
        WH_CALLWNDPROCRET = 12,
        WH_KEYBOARD_LL = 13,
        WH_MOUSE_LL = 14
    }
 
    protected IntPtr m_hhook = IntPtr.Zero;
    protected HookType m_hookType = HookType.WH_KEYBOARD;
 
    protected delegate int HookProc(int code, IntPtr wParam, IntPtr lParam);
 
    protected bool Install(HookProc cbFunc)
    {
        if (m_hhook == IntPtr.Zero)
            m_hhook = SetWindowsHookEx(
                m_hookType, 
                cbFunc, 
                IntPtr.Zero, 
                (int)AppDomain.GetCurrentThreadId());
 
        if (m_hhook == IntPtr.Zero)
            return false;
 
        return true;
    }
 
    protected void Uninstall()
    {
        if (m_hhook != IntPtr.Zero)
        {
            UnhookWindowsHookEx(m_hhook);
            m_hhook = IntPtr.Zero;
        }
    }
 
    protected int CoreHookProc(int code, IntPtr wParam, IntPtr lParam)
    {
        if (code < 0)
            return CallNextHookEx(m_hhook, code, wParam, lParam);
 
        Debug.Log(
            "hook code =" + code.ToString() + 
            " lparam=" + lParam.ToString() + 
            " wparam=" + wParam.ToString());
 
        // Yield to the next hook in the chain
        return CallNextHookEx(m_hhook, code, wParam, lParam);
    }
 
    // Use this for initialization
    void Start()
    {
        Debug.Log("install hook");
        Install(CoreHookProc);
    }
 
    void OnDisable()
    {
        Debug.Log("Uninstall hook");
        Uninstall();
    }
 
}

2010-12-24

從檔案載入 Lua function 至名稱空間

參考連結,可將 lua 檔案裡的程式載入到 namespace 裡,好處是可避免各個不同檔案裡出現相同 function 的問題。

稍微針對 C# 做了修改如下:

protected bool load_file_into_namespace(IntPtr L, string S, string N, bool bCall)
{
    lua_pushlstring(L, N, N.Length);
    lua_gettable(L, (-10002));
 
    if (lua_isnil(L, -1))
    {
        lua_pop(L, 1);
        lua_newtable(L);
        lua_pushlstring(L, N, N.Length);
        lua_pushvalue(L, -2);
        lua_settable(L, (-10002));
    }
    else
    {
        if (!lua_istable(L, -1))
        {
            lua_pop(L, 1);
            return (false);
        }
    }
 
    lua_newtable(L);
    lua_pushlstring(L, "_G", 2);
    lua_gettable(L, (-10002));
    lua_pushnil(L);
    while (lua_next(L, -2) != 0)
    {
        lua_pushvalue(L, -2);
        lua_pushvalue(L, -2);
        lua_settable(L, -6);
        lua_pop(L, 1);
    }
 
    if ((luaL_loadfile(L, S) > 0))
    {
        Console.Write("Error in file " + S + "!\n");
        for (int i = 0; ; i++)
            if ((lua_isstring(L, i) > 0))
            {
                Console.Write(lua_tolstring(L, i, IntPtr.Zero) + "\n");
            }
            else
                break;
        lua_error(L);
        lua_pop(L, 3);
        return (false);
    }
 
    if (bCall)
        lua_call(L, 0, 0);
    else
        lua_insert(L, -4);
 
    lua_pushnil(L);
    while (lua_next(L, -2) != 0)
    {
        lua_pushvalue(L, -2);
        lua_gettable(L, -5);
        if (lua_isnil(L, -1))
        {
            lua_pop(L, 1);
            lua_pushvalue(L, -2);
            lua_pushvalue(L, -2);
            lua_pushvalue(L, -2);
            lua_pushnil(L);
            lua_settable(L, -7);
            lua_settable(L, -7);
        }
        else
        {
            lua_pop(L, 1);
            lua_pushvalue(L, -2);
            lua_gettable(L, -4);
            if (!(lua_equal(L, -1, -2) > 0))
            {
                lua_pushvalue(L, -3);
                lua_pushvalue(L, -2);
                lua_pushvalue(L, -2);
                lua_pushvalue(L, -5);
                lua_settable(L, -8);
                lua_settable(L, -8);
            }
            lua_pop(L, 1);
        }
        lua_pushvalue(L, -2);
        lua_pushnil(L);
        lua_settable(L, -6);
        lua_pop(L, 1);
    }
 
    lua_pop(L, 3);
    return (true);
}

其中 S 表示檔案路徑, N 表示名稱空間。呼叫名稱空間內的 function 方式也會有些不同:

1) 以 luaL_dostring 方式呼叫:

假設載入的file0.lua 檔如下:
function pp()
  print("this is file0");
end

載入的 file1.lua 檔案下:
function pp()
  print("this is file1");
end

載入 file0.lua 時設定的 namespace 為 A0,載入 file1.lua 時設定的 namespace 為 A1,載入的程式碼為:
load_file_into_namespace(m_luaState, "file0.lua", "A0", true);
load_file_into_namespace(m_luaState, "file1.lua", "A1", true);

則分別呼叫 file0.lua及file1.lua內的 pp() 函數方式如下:
A0.pp();
A1.pp();

程式碼寫法是:
luaL_dostring(m_luaState, "A0.pp()");
luaL_dostring(m_luaState, "A1.pp()");

2) 以 lua_pcall 方式呼叫(以呼叫 A0.pp() 為例子)
lua_getglobal(m_luaState, "A0");
if (lua_type(m_luaState, -1) == 5)
{
    lua_getfield(m_luaState, -1, "pp");
 
    if (lua_type(m_luaState, -1) == 6)
    {
        // This removes the foo table from the stack
        lua_replace(m_luaState, -2); 
        ret = lua_pcall(m_luaState, 0, 0, 0);
 
        if (ret != 0)
        {
            lua_pop(m_luaState, 1);
        }
    }
    else
    {
        lua_pop(m_luaState, 2);
    }
 
}
else
{
    lua_pop(m_luaState, 1);
}

2010-12-17

Hermite Curve (Hermite Spline)

參考 這個連結 ,Hermite Curve 可以寫成一個 2D Hermite Curve Function 如下:

void hermiteCurve(
 const float t, 
 const float* vPt, 
 const float* vTangent, 
 float* pOutPt)
{
    float tt = t * t;
    float ttt = tt * t;
 
 for (int i=0;i<2;++i)
 {
    pOutPt[i] =(2.0f * ttt - 3.0f * tt + 1.0f) * vPt[0*2+i] + 
       (ttt - 2.0f * tt + t) * vTangent[0*2+i] + 
       (-2.0f * ttt + 3.0f * tt) * vPt[1*2+i] + 
       (ttt - tt) * vTangent[1*2+i];
 }
 
}

其中 t 表示欲內插的點在曲線上的比例值(區間從 0~1)。vPt 表示曲線的起點跟終點位置,是一個 float[4] 的變數,其中起點是(vPt[0], vPt[1]),終點是(vPt[2], vPt[3])。vTangent 表示曲線起點跟終點的切線向量,其中起點的切線向量是(vTangent[0], vTangent[1]),終點的切線向量是(vTangent[2], vTangent[3])。pOutPt 是比例值 t 內插出來的位置,是一個 float[2] 的變數。

2010-12-13

Unity 3D + freeimage library 執行時期載入圖檔

unity 本身提供方便的檔案載入功能 WWW(參考連結),它能讓程式在執行當中從網路或者硬碟載入資料,底下是一個 WWW 簡單的圖檔載入方法:

using UnityEngine;
using System.Collections;
 
public class example : MonoBehaviour {
    public string url = "http://images.earthcam.com/ec_metros/ourcams/fridays.jpg";
    IEnumerator Start() {
        WWW www = new WWW(url);
        yield return www;
        renderer.material.mainTexture = www.texture;
    }
}

但是使用WWW目前只能載入PNG和JPG兩種格式的圖檔,若要在程式執行時載入其它格式的圖檔,就要自己把檔案轉成 Unity Color 格式再寫入 Texture2D 物件,底下是使用 Unity 3D + freeimage library 來讀取圖檔的範例:

1) 到 這裡 下載 FreeImageDLL,其中包含 FreeImageNET.dll, FreeImage.dll 兩個檔案,將這兩個檔案在專案的 Plugins 目錄下。

2) 到 Project Settings --> Player --> Optimization 將 Api Compatibility Level 改為 .Net 2.0(預設通常為 .Net 2.0 Subset)

3) 建立一個 C Sharp Script 之後直接就可以使用 freeimage API,這邊列舉載入圖片的方法:

bool load24BITBMPImage(string strPath, out Texture2D pOutTex)
{
    if (!FreeImageAPI.FreeImage.IsAvailable())
    {
        pOutTex = null;
        return false;
    }
 
    FreeImageAPI.FIBITMAP dib = FreeImageAPI.FreeImage.Load(FreeImageAPI.FREE_IMAGE_FORMAT.FIF_BMP, strPath, FreeImageAPI.FREE_IMAGE_LOAD_FLAGS.DEFAULT);
    if (dib.IsNull)
    {
        FreeImageAPI.FreeImage.Unload(dib);
 
        pOutTex = null;
        return false;
    }
 
    uint nWidth = FreeImageAPI.FreeImage.GetWidth(dib);
    uint nHeight = FreeImageAPI.FreeImage.GetHeight(dib);
    uint nPitch = FreeImageAPI.FreeImage.GetPitch(dib);
 
    pOutTex = new Texture2D((int)nWidth, (int)nHeight, TextureFormat.ARGB32, false);
    Color[] pColor = new Color[nWidth * nHeight];
 
    // 參考 FreeImage Sample5 - Working with pixels
    // Iterate over all scanlines
    for (int i = 0; i < FreeImageAPI.FreeImage.GetHeight(dib); i++)
    {
        // Get scanline
        FreeImageAPI.Scanline<FreeImageAPI.RGBTRIPLE> scanline = new FreeImageAPI.Scanline<FreeImageAPI.RGBTRIPLE>(dib, i);
 
        // Get pixeldata from scanline
        FreeImageAPI.RGBTRIPLE[] rgbt = scanline.Data;
 
        // Iterate over each pixel reducing the colors intensity to 3/4 which
        // will darken the bitmap.
        for (int j = 0; j < rgbt.Length; j++)
        {
            pColor[i * nWidth + j].b = rgbt[j].rgbtBlue;
            pColor[i * nWidth + j].g = rgbt[j].rgbtGreen;
            pColor[i * nWidth + j].r = rgbt[j].rgbtRed;
        }
 
    }
 
    pOutTex.SetPixels(pColor, 0);
    pOutTex.Apply();
 
    pColor = null;
    FreeImageAPI.FreeImage.Unload(dib);
 
    return true;
}

但此方法在寫入 pColor 矩陣時的速度有點慢,關於這部分有另一種作法是使用指標操作來寫入,大概的方式是使用 FreeImage 的 GetBits 指令來取得記憶體位置, pColor 方面則是使用 GCHandle.alloc 及 AddrOfPinnedObject 來取得 pColor 的記憶體位置,最後利用呼叫外部 dll 方式由 C 語言指標來完成工作。

2010-12-02

Unity 3D 字串只顯示在指定區域內

3D Text 字串顯示可用在很多地方例如文字編輯器,跑馬燈等...。以跑馬燈為例,字體因為只能顯示在特定範圍內,因此當字體從邊框跑進來時需要對字體進行裁切。這邊對字體裁切的概念是在字串 Mesh 前方建立一個隱形的 Clipper,當後方字串進行貼圖時,將圖片像素的座標空間轉換至 Clipper 的座標空間,然後檢查像素的範圖是否在 Clipper 內,否則將像素設定成透明。


欲達成上述效果需要自己寫相對應的 Shader 並套用在 3D Text 上,這裡提供 Shader 如下:
Shader "ModifiedTextShader"
{ 
 Properties
 {
  _MainTex ("Font Texture", 2D) = "white" {}
  _Color ("Text Color", Color) = (1,1,1,1) 
 }
 
 SubShader
 {
  Tags
  {
   "Queue"="Transparent"
   "IgnoreProjector"="True" 
   "RenderType"="Transparent"
  }
 
  Pass
  {
   CGPROGRAM
   // Upgrade NOTE: excluded shader from OpenGL ES 2.0 because it does not contain a surface program or both vertex and fragment programs.
   #pragma exclude_renderers gles
   #pragma vertex vert
   #pragma fragment frag
   #include "UnityCG.cginc"
 
   struct v2f
   {
    float4 pos : SV_POSITION;
    float4 uv[2] : TEXCOORD0;
    float4 color : COLOR0;
   };
 
   uniform float4x4 _ClipMatrix;
   uniform float4 _Color;
   sampler2D _MainTex;
   uniform float _ClipWidth;
   uniform float _ClipHeight;
 
   v2f vert( appdata_base v )
   {
    v2f o;
    o.pos = mul (UNITY_MATRIX_MVP, v.vertex);
 
    o.uv[0] = v.texcoord;
 
    float4 c = mul( _Object2World, v.vertex ); 
    c = mul( _ClipMatrix, c ); 
    o.uv[1] = c;
 
    o.color = _Color;
 
    return o;
   }
 
   half4 frag(v2f i) : COLOR
   {
    half4 texcol =tex2D(_MainTex, i.uv[0].xy);
    texcol =float4(i.color.r, i.color.g, i.color.b ,texcol.a);
 
    float halfWidth =_ClipWidth*0.5f;
    float halfHeight =_ClipHeight*0.5f;
    if (
     i.uv[1].x >halfWidth || 
     i.uv[1].x <-halfWidth|| 
     i.uv[1].y >halfHeight || 
     i.uv[1].y <-halfHeight)
     texcol.a =0;
 
    return texcol;
   }
 
   ENDCG
 
   Cull Off
   ZWrite On 
   Fog { Mode Off } 
   Blend SrcAlpha OneMinusSrcAlpha 
  }
 } 
}

其中 _ClipMatrix,_ClipWidth與_ClipHeight分別代表Clipper的座標轉換矩陣,Clipper的寬度和Clipper的高度,使用此Shader時:

1) 將此Shader設定給3DText的Mesh Renderer
2) 設定 font Texture 給此 Shader 的 Font Texture
3) 建立 clipper 物件並在物件內加入下列指令:
Shader.SetGlobalMatrix("_ClipMatrix", transform.worldToLocalMatrix);
Shader.SetGlobalFloat("_ClipWidth", 20.0f);
Shader.SetGlobalFloat("_ClipHeight", 20.0f);
分別代表設定 Clipper 轉換矩陣、Clipper的寬度為 20, Clipper的高度為 20。

Unity 3D 顯示字串

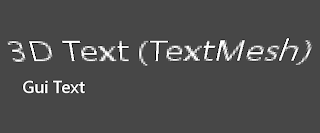
Unity 有兩種物件專門用來顯示字串,分另是 GUI Text 和 3D Text (Text Mesh)。


GUI Text 使用上相當方便,螢幕座標設定範圍是 0.0 ~1.0,只能做 2D 顯示,3D Text 則是在 3D 空間實際產生 Mesh 並以貼圖的方式顯示字串。大概可以了解到優缺點如下:

GUI Text
優點:使用方便, 速度快。
缺點:無法旋轉,無法覆蓋,無法變形。

3D Text
優點:所有可以應用在 Mesh 上的功能。
缺點:因為要畫Mesh並做貼圖動作,也許速度較慢,設定較麻煩。

礙於功能上的需要,例如字串的旋轉、縮放效果。似乎 2D 的 GUI 也使用 3D Text (Text Mesh) 會比較合理,但 3D Text 在透視投影模式的 Camera 之下顯示不如 GUI Text 來得清晰,其實透過設定就可以讓 3D Text 顯示的效果與 GUI Text 一模一樣,設定方法如下:


1) 將 Camera 的投影模式設定成 Orthographic,並設定  Orthographic Size 為 Screen.height 的 0.5 倍。
2) 設定 3D Text 物件 Scale 的 x, 和 y 分別是 Orthographic Size 的 0.022 倍,例如 Orthographic Size 為 100,則 Scale 就是 2.2,固定是  10 倍,此時的 Font Size 值效果將與 GUI Text 的 Font Size 值效果相同。

這邊可能有疑問的是 Camera 若設定成 Orthographic 投影模式,則會影響到其它物件的顯示,解決方法是在場景裡新建一個 Camera, 由此新建的 Camera 負責 Text 的部分,利用 Layer 及 Culling Mask 的功能把揚景裡的物件及 3D Text 區分開並分別指定給各個 Camera。