參考討論串 https://github.com/senchalabs/connect/issues/262,作者將 router 功能歸類在更上層的 express ,因此 connect 不再維護/提供 router 的功能了,若要繼續使用新版的 connect ,其原本 router 的功能可以從這裡 https://github.com/DamonOehlman/connectables 取得!經過測試,在 node 0.6.14 及 connect 2.0.3 上可正常使用!
2012-03-28
2012-03-06
linux / osx 指令筆記
顯示程式需要的 library
readelf -d <file> | grep -i shared
iptables 將 port 從 443 導到 5200
iptables -t nat -A PREROUTING -i eth0 -p tcp --dport 443 -j REDIRECT --to-port 5200
(刪除)
iptables -t nat -D PREROUTING -i eth0 -p tcp --dport 443 -j REDIRECT --to-port 5200
查看 iptables port forward 之設定
iptables -t nat -L -n -v
將 ssh public key 加入到對方電腦的 authorized_keys 裡
cat .ssh/id_rsa.pub | ssh b@B 'cat >> .ssh/authorized_keys'
查詢某檔案或某資料夾 (包含其子資料夾) 之佔用的硬碟空間
du -sh ./file_or_dir
透過 SSH 遠端執行指令 "pwd; ls;"
ssh -l user0 ip0 -p port "pwd; ls;"
SSH Tunnel 建立通道 (在 ip0 建立通道,讓輸入指令端可以透過 ip0 連線至 TARGET_IP) :
ssh -N -L localhost:2222:TARGET_IP:TARGET_PORT user0@ip0
SSH Tunnel 建立通道 (此時在 ip0 可以透過 2222 連回輸入指令端):
ssh -R 2222:localhost:22 user0@ip0 -p port0
建立 socks5 (3128) 通道:
SSH Tunnel 建立後 (此時應已進入 ip0:port0 ) 再輸入 :
ssh -p 2222 -D 3128 user1@localhost
OSX 開啟/關閉 apache2:
sudo apachectl start
sudo apachectl stop
OSX 開啟/關閉 postfix:
sudo launchctl start org.postfix.master
sudo launchctl stop org.postfix.master
同步/更新時間:
ntpdate pool.ntp.org
mac port 一些指令:
1) port selfupdate 檢查更新
2) port installed 檢查已安裝項目
3) port search [item] 搜尋可安裝項目 (例 port search nodejs)
4) port install [item] 安裝項目
5) port uninstall [item] 反安裝項目
6) port upgrade outdated 更新已安裝的套件
OSX Finder 顯示隱藏檔案及資料夾:
1) defaults write com.apple.Finder AppleShowAllFiles TRUE
2) killall Finder
OSX Finder 不顯示隱藏檔案及資料夾:
1) defaults write com.apple.Finder AppleShowAllFiles FALSE
2) killall Finder
screen
1) screen -m -d -S <ScreenName> <Command> 背景開新的 screen 並執行程式
2) screen -ls 列出目前所有 screen 狀態
3) Control+A 放開再按 D 跳離 screen
4) Control+A 放開再按 Esc 上下捲動 Screen
設定日期
date -s "2 OCT 2006 18:00:00"
更改 ulimit -n 之預設上限
1. 編輯檔案 /etc/security/limits.conf , 在結尾新增 :
* soft nofile 50240
* hard nofile 50240
2. reboot
ubuntu 新增 user
sudo adduser <username>
ubuntu 設定 user 為管理者
sudo adduser <username> admin
OSX 顯示目前正在等待連線的 TCP Port
sudo lsof -nP -iTCP -sTCP:LISTEN
MacPort 使用 http 更新 :
修改檔案 /opt/local/etc/macports/sources.conf
將原本的 [default] 那一行改成
http://www.macports.org/files/ports.tar.gz [default]
最後使用指令
cd /opt/local/etc/macports/ && sudo port -d sync && sudo portindex
ref : https://destefano.wordpress.com/2011/03/18/macports-behind-a-proxy/
2011-12-13
lua and 64bit integer
lua 的整數運算很不幸的,只有到 32bit 的範圍(-2,147,483,648 ~ 2,147,483,647),但透過 lnum 之 patch 之後,可支援到 64bit(-9,223,372,036,854,775,808 ~ 9,223,372,036,854,775,807)底下是 patch 之過程的記錄:
1. 到 這裡 取得 Lua 5.1.4 原始碼。
2. 到 這裡 取得 lua514-lnum-20090417.patch.tgz。
3. 執行 patch 指令
a. linux or mac :
i. 解壓解 lua 5.1.4 及 lua514-lnum-20090417.patch.tgz
ii. 把 lua514-lnum-20090417.patch 擺在 lua 5.1.4 之 src 目錄下
ii. 進到 lua src 檔目錄下
iii. 執行 patch < lua514-lnum-20090417.patch
b. windows :
i. 到 這裡 下載 patch 執行檔
ii. 解壓解 lua 5.1.4 及 lua514-lnum-20090417.patch.tgz
ii. 把 lua514-lnum-20090417.patch 和 patch.exe 擺在 lua 5.1.4 之 src 目錄下
ii. 進到 lua src 檔目錄下
iii. 假如使用的是 win7, vista 作業系統,須把 patch.exe 改成其它名稱(例如 cc.exe)
iv. 執行 patch < lua514-lnum.patch(或者 cc < lua514-lnum.patch)
v. 假如顯示 Assertion failed: hunk, file ../patch-2.5.9-src/patch.c, line 354…訊息:
1. 執行 write lua514-lnum-20090417.path
2. 將會跳出 wordpad 視窗,此時直接按存檔並離開
3. 重新執行 iv 指令
4. 開啟 luaconf.h,找到下列關鍵字:
/*
@@ LNUM_DOUBLE | LNUM_FLOAT | LNUM_LDOUBLE: Generic Lua number mode
@@ LNUM_INT32 | LNUM_INT64: Integer type (optional)
@@ LNUM_COMPLEX: Define for using 'a+bi' numbers
@*
@* You can combine LNUM_xxx but only one of each group. I.e. 'LNUM_FLOAT
@* LNUM_INT32 LNUM_COMPLEX' gives float range complex numbers, with
@* 32-bit scalar integer range optimized.
*/
/*#define LNUM_DOUBLE*/
5. 在關鍵字下一行加入 #define LNUM_INT64
6. 開始編譯(可參考 這篇)
redirect git stdout message
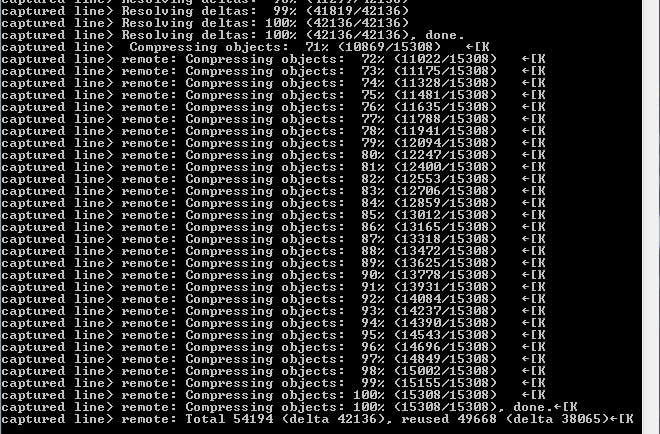
假如現在執行一個 git 指令 “git clone git://github.com/joyent/node” 其顯示的訊息(包含檔案下載的進度)為:

最後完成時顯示為:

若要在 C# 執行上述 git 指令,通常使用 System.Diagnostics.Process 來呼叫執行,其程式碼如下:
 由上圖發現執行過程中,只有顯示一行訊息,猜測是因為 git 在執行時期會呼叫其它的 process,而這些 process 所顯示的訊息未被 redirect 到 C#,下圖是 process explorer 在 git 執行時期所擷取的畫面,發現 git 的確產生 child process 來處理其它工作:
 因此若要擷取 child process 顯示的訊息,改用下列指令:

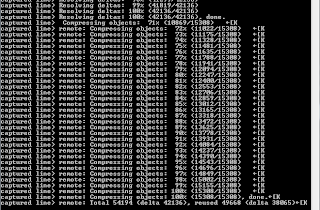 終於把所有的訊息都 redirect 到 C# 了。

最後完成時顯示為:
若要在 C# 執行上述 git 指令,通常使用 System.Diagnostics.Process 來呼叫執行,其程式碼如下:
static void Main(string[] args)執行結果為:
{
Process myProcess = new Process();
ProcessStartInfo info = new ProcessStartInfo("git.exe", "clone git://github.com/joyent/node");
info.CreateNoWindow = true;
info.UseShellExecute = false;
info.RedirectStandardOutput = true;
info.WorkingDirectory = "";
myProcess.StartInfo = info;
myProcess.OutputDataReceived += new DataReceivedEventHandler(myProcess_OutputDataReceived);
myProcess.Start();
myProcess.BeginOutputReadLine();
myProcess.WaitForExit();
myProcess.Close();
}
static void myProcess_OutputDataReceived(object sender, DataReceivedEventArgs e)
{
if (!String.IsNullOrEmpty(e.Data))
{
Console.WriteLine("captured line> "+e.Data);
}
}
cmd.exe /C “git.exe clone git://github.com/joyent/node –progress 2>&1”程式碼修改為:
ProcessStartInfo info = new ProcessStartInfo("cmd.exe", "/C " + "" + "git.exe clone git://github.com/joyent/node --progress 2>&1" + "");執行結果為:

2011-11-24
git 使用筆記
刪除所有 .git 資料夾
find . -type f | grep -i .git | xargs rm
取得程式:
git clone git://URL
取得最新的程式:
git pull
目前狀態:
git status
如果確定 repo 有更新,但使用 git pull 確沒有效果(顯示 Your system reports no Git commands at all.)時使用:
git fetch origin master:tmp
git merge tmp
程式修改完之後:
git add .
git commit –a –m '註解'
git commit -i <file> -m '註解'
刪除沒有被加入到 git 的檔案:
git clean –d -f
回復上次 commit 前的狀態(包含實際檔案):
git reset –-hard HEAD^
回復到與 repo 上 origin/master 相同的狀態(包含實際檔案):
git reset –-hard origin/master
個別檔案回復到 modified 之前的狀態(包含實際檔案):
git checkout <filename>
個別檔案回復到某次 commit 時的狀態(包含實際檔案):
git checkout <commit id> <filename>
回復上次 commit 前的狀態(不包含實際檔案):
git reset –-soft HEAD^
更改 branch 名稱:
git branch -m <old_name> <new_name>
修改的程式回寫至 repo:
git push
--------------------
列出 stash 清單:
git stash list
將 working copy 暫存:
git stash
取出最後一次執行暫存的 stash:
git stash pop
--------------------
產生備份:
git bundle create <filename> --all
還原至某目錄:
git clone <filename> <foldername>
至該 folder 內輸入:
git fetch
git pull
將現有的 repository push 還原至其它 repository
git push http://<git repo url> +<current branch>:master
--------------------
收拾失控的 repository (objects/pack/ 資料夾內出現一堆 pack file)
git gc --aggressive
統計 repository objects
git count-objects -v
2011-11-13
Objective-C 執行緒同步 ( NSCondition )
撰寫多執行緒程式都會碰到資料同步問題,objc 在這邊可使用 NSCondition 來達成,底下是 NSCondition 與 C#,C++用法比較:
Objective-C 的用法如下:其它有關執行緒同步的文章參考這篇。
NSCondition* pLock =[NSCondition new];
[pLock lock];
{
//...
}
[pLock unlock];
[pLock release];
C++ 的用法如下: HANDLE m_Handle =CreateSemaphore( NULL, 1, 1, L"SemaphoreName" );
WaitForSingleObject( m_Handle, nWaitTime );
{
//...
}
ReleaseSemaphore( m_Handle, 1, NULL );
CloseHandle( m_Handle );
C# 的用法如下:
private static AutoResetEvent m_Handle =new AutoResetEvent( true );
m_Handle.WaitOne();
{
//...
}
m_Handle.Set();
Objective-C 多執行緒 ( NSOperationQueue )
objc 的 NSOperationQueue 跟 Thread Pool 很類似,用起來也非常的容易,這邊把 Operation 看成 Thread Task , Operation Queue 則看成 Thread Pool 。
底下舉一個簡單的例子:主執行緒使用另一個執行緒印出 “i am taskClass” 字串
底下舉一個簡單的例子:主執行緒使用另一個執行緒印出 “i am taskClass” 字串
//taskClass 負責印出 “i am taskClass” 字串此外,假如 Operation 執行的程式屬於無限迴圈,則在主程式要結束時,可用 cancelAllOperations 函數來通知 Queue 裡的 Operation 中斷迴圈並結束程式,舉例如下:
@interface taskClass : NSOperation {
}
//main 繼承於 NSOperation, 執行緒啟動時將執行這個函數
-(void) main;
@end
@implementation taskClass
-(void) main
{
NSAutoreleasePool* nsap =[NSAutoreleasePool new];
NSLog(@"i am taskClass");
[nsap drain];
}
@end
//主程式
int main (int argc, const char * argv[])
{
NSAutoreleasePool* nsap =[NSAutoreleasePool new];
//建立 NSOperationQueue
NSOperationQueue* nsoq =[NSOperationQueue new];
//設定最多同時執行的執行緒數
[nsoq setMaxConcurrentOperationCount:10];
//建立 taskClass
taskClass* myTaskClass =[taskClass new];
//將 taskClass 丟給 NSOperationQueue
//NSOperationQueue 會分配執行緒去執行 taskClass 的 main 函數
[nsoq addOperation:myTaskClass];
//等待 Queue 裡所有的 Operation 執行完畢
[nsoq waitUntilAllOperationsAreFinished];
[myTaskClass release];
[nsoq release];
[nsap drain];
}
@interface taskClass : NSOperation {
}
-(void) main;
@end
@implementation taskClass
-(void) main
{
//檢查 Cancelled 是否為 true, 否則繼續執行
while ([self isCancelled]==false) {
//迴圈工作...
}
}
@end
//主程式
int main (int argc, const char * argv[])
{
NSAutoreleasePool* nsap =[NSAutoreleasePool new];
NSOperationQueue* nsoq =[NSOperationQueue new];
[nsoq setMaxConcurrentOperationCount:10];
taskClass* myTaskClass =[taskClass new];
[nsoq addOperation:myTaskClass];
//通知所有執行中的 Operation 中斷執行
[nsoq cancelAllOperations];
[nsoq waitUntilAllOperationsAreFinished];
[myTaskClass release];
[nsoq release];
[nsap drain];
}
2011-11-07
Objective-C dot(.) 與 arrow(->)
objc 在這裡跟 C++ 一樣,可以透過 (.) 及 (->) 來存取類別(class) 的成員 “變數”,但在 objc 的 property 機制影響之下,有些地方可能會搞不清楚。底下做了一些整理。
假如目前有一個 class 如下:
假如目前有一個 class 如下:
定義:dot(.) 與 arrow(->) 的操作:
@interface classA :NSObject{
@private
int val;
@public
int pubVal;
}
-(void) initVal: (int) newVal;
-(void) printVal;
@end
實作:
@implementation classA
@synthesize val, pubVal;
-(void) initVal:(int)newVal
{
val =newVal;
}
-(void) printVal
{
NSLog(@"val=%d", val);
}
@end
classA* bbb =[classA new];執行的結果為:
//dot notation
//設定值
bbb.pubVal =5; //dot 透過 property 機制存取, 同等於 [bbb setPubVal:5];
bbb.val =6; //dot 透過 property 機制存取, 同等於 [bbb setVal:6];
(*bbb).pubVal =7; //dot 可直接存取 @public member
//(*bbb).val =8; //Error, 不是 @public member
//取值
int tmpVal;
tmpVal =bbb.pubVal; //tmpVal =7,同等於tmpVal =[bbb pubVal];
tmpVal =bbb.val; //tmpVal =6,同等於tmpVal =[bbb val];
tmpVal =(*bbb).pubVal; //tmpVal =7
//tmpVal =(*bbb).val; //Error, 不是 @public member
//arrow notation
//設定值
bbb->pubVal =5; //arrow 可直接存取 @public member
//bbb->val =5; //Error, 不是 @public member
//取值
tmpVal =bbb->pubVal; //tmpVal =7
//tmpVal =bbb->val; //Error, 不是 @public member
//使用函數操作
//設定值
[bbb setPubVal:5]; //setPubVal 函數由 property 機制自動產生
[bbb setVal:6]; //setVal 函數由 property 機制自動產生
//取值
tmpVal =[bbb pubVal];
tmpVal =[bbb val];
[bbb initVal:10];
[bbb printVal];
[bbb release];
val=10
2011-11-04
Objective-C SEL ( Selector )
暫時先“想像” objc 的 SEL 就像是 C 的函數指標(但在 objc 裡另外還有 IMP, 其定義同等於 C 的函數指標),例如現在有一個類別如下:
執行的結果為:
定義:SEL ( Selector ) 的操作範例如下:
@interface classA :NSObject{
@private
int val;
}
-(void) initVal: (int) newVal;
-(void) printVal;
@end
實作內容:
@implementation classA
-(void) initVal:(int)newVal
{
val =newVal;
}
-(void) printVal
{
NSLog(@"val=%d", val);
}
@end
id ppp =[classA new];其中的 printPP1, printPP2 皆指向 classA 的 printVal 函數, 因此 SEL 的產生方式可以有 @selector 或是 NSSelectorFromString 兩種。
[ppp initVal:99];
SEL printPP1 =@selector(printVal);
SEL printPP2 =NSSelectorFromString(@"printVal");
if ([ppp respondsToSelector:printPP1])
[ppp performSelector:printPP1];
if ([ppp respondsToSelector:printPP2])
[ppp performSelector:printPP2];
[ppp release];
執行的結果為:
val=99
val=99
2011-07-23
freeimage + DDS ( nvidia texture tools )
前段時間遇到一個需求是把 bmp, png 轉成 dds 格式,且在過程中自動把 bmp, png 的圖形放大到二的冪次方大小。
後來使用兩套工具解決這個需求:
底下為把圖片轉成 DDS 格式的簡單實作:
1) 載入圖檔 (src.jpg):
2) 將圖檔轉成 RGBA 32bit 格式:
3) 取得圖形資料:
4) 設定欲壓縮的圖形資料格式
5) 設定 DDS 檔格式,此處使用的是 DXT1a 格式
6) 壓縮並儲存成 DDS 檔 (dst.dds):
7) 最後不忘刪除記憶體:
後來使用兩套工具解決這個需求:
- Freeimage 來做圖檔的讀取工具,
- nvidia 提供的 texture tools 來做圖檔的格式轉換及壓縮工具,
底下為把圖片轉成 DDS 格式的簡單實作:
1) 載入圖檔 (src.jpg):
std::string filename("src.jpg");
FREE_IMAGE_FORMAT fif =FreeImage_GetFileType( filename.c_str() );
FIBITMAP* dib =NULL;
dib = FreeImage_Load( fif, filename.c_str() );
2) 將圖檔轉成 RGBA 32bit 格式:
FIBITMAP* dib32 = FreeImage_ConvertTo32Bits(dib);
3) 取得圖形資料:
int nWidth =FreeImage_GetWidth(dib);
int nHeight =FreeImage_GetHeight(dib);
BYTE* pSrcDIB =FreeImage_GetBits(dib32);
4) 設定欲壓縮的圖形資料格式
nvtt::InputOptions inputOptions;
inputOptions.setTextureLayout(nvtt::TextureType_2D, nWidth, nHeight);
inputOptions.setMipmapData(pSrcDIB, nWidth, nHeight);
inputOptions.setFormat(nvtt::InputFormat_BGRA_8UB);

inputOptions.setWrapMode(nvtt::WrapMode_Clamp);
inputOptions.setAlphaMode(nvtt::AlphaMode_Transparency);

inputOptions.setNormalMap(false);
inputOptions.setConvertToNormalMap(false);
inputOptions.setGamma(2.2f, 2.2f);
inputOptions.setNormalizeMipmaps(false);

inputOptions.setMipmapGeneration(false);
5) 設定 DDS 檔格式,此處使用的是 DXT1a 格式
nvtt::CompressionOptions compressionOptions;
compressionOptions.setFormat(nvtt::Format_DXT1a);
//compressionOptions.setQuality(nvtt::Quality_Fastest);
//compressionOptions.setQuality(nvtt::Quality_Normal);
//compressionOptions.setQuality(nvtt::Quality_Production);
compressionOptions.setQuality(nvtt::Quality_Highest);
6) 壓縮並儲存成 DDS 檔 (dst.dds):
nvtt::OutputOptions outputOptions;
outputOptions.setFileName("dst.dds");

nvtt::Compressor compressor;
compressor.enableCudaAcceleration(false);
compressor.process(inputOptions, compressionOptions, outputOptions);
7) 最後不忘刪除記憶體:
FreeImage_Unload(dib32);
FreeImage_Unload(dib);
訂閱:
文章
(
Atom
)